- Home
- Embroidery
- Cutwork Embroidery
Cutwork embroidery techniques
Cutwork embroidery, a timeless surface technique, has been fascinating stitch enthusiasts for centuries with its intricate beauty.
From the ornate richness of Renaissance to the charm of Richelieu, this ancient art form has evolved into various styles, each with its unique twist.
But, before you can learn the intricacies of these advanced techniques, it's essential to start with the basics.

On this page, we'll explore the fundamentals of cutwork embroidery, using my simple tulip design.
By the end of this tutorial, you'll be equipped with the skills to create your own exquisite cutwork pieces, whether you prefer traditional white, ecru or bold coloured threads that reflect your personal style.
The stitch is also used in hardanger embroidery and the diagrams on my free pattern may also help to guide you, although keep in mind that hardanger is a counted technique.
Transferring your design onto the fabric
As this is a surface embroidery technique your first task will be to transfer your outline onto your fabric.
If the picture you have chosen was not specifically designed for cutwork embroidery you will need to retrace the outline with a pair of parallel lines about 1/8th inch apart.
Where you will eventually cut the fabric away, bridge the gaps with single dotted lines. This will help avoid mistakes when stitching as the difference will be obvious.
My go-to technique of transferring the prepare pattern onto the fabric involves using a specialised disappearing ink pen.
These amazing pens come in two varieties.
Time-Sensitive Pen: This pen's marks gradually fade away over time, making it ideal for small designs. Just be sure to complete your work before the ink vanishes.
Water-Sensitive Pen: This pen's marks disappear with a gentle touch of water, making it perfect for larger, more time consuming designs. With this pen, you can work at your own pace, knowing that any mistakes or unwanted lines can be easily washed away when the time comes.
Method
If you can see through your fabric, lay it on top of the printed outline and trace over it with the pen.
For more dense weaves you may find you need a light source behind the pattern. You can use a window during the daytime or a light pad if you have one available.
Outlining and buttonhole bars
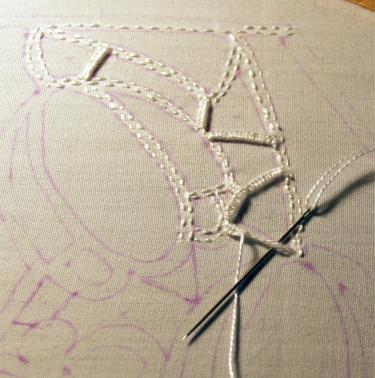
Place your fabric in a hoop and work close running stitches along each doubled line. Remember, don't pull them too tight, or you risk puckering the fabric.
When you reach a single dotted line take one long stitch across what will be an open area of the design. Bring your needle up between the doubled row of running stitch on one side, and take it down in the same manner on the other.
Repeat this twice more to give you three long stitches.
You'll end up on the opposite side to where you started. To get back to your starting point use a buttonhole stitch over those three threads.
Tip: You might want to change to a blunt tapestry needle when buttonholing the bars to reduce the risk of piercing the fabric.
Don't take your needle through the fabric until you reach your running stitches. Then, continue until you reach the next buttonhole bar.
Continue until all of the design is either outlined with a double row of running stitch or has a buttonhole bar laying over the pen marks.
The Buttonhole stitch
Setting Up For Success...
Now, it's time to work on those buttonhole stitches. But first, take a moment to:
Mark the cut out areas: Use your disappearing ink pen to mark a cross in each area that will be cut out later.
Orient your corded edge: Double-check that the corded edge of the buttonhole stitch is on the side that will be cut.
Hoop or No Hoop?
You can stitch buttonhole in the hand, but I prefer to keep the fabric taut in an embroidery hoop to get a better tension on my stitches. This means you need to use a stabbing motion rather than putting the needle in and out of the fabric in one movement.
The Secret to Neat Buttonhole Stitches
Here's the key to achieving beautiful, even stitches:
Stitch at right angles: Make sure your buttonhole stitches are placed at right angles to your running stitched lines. This will create a clean, professional finish.
Lift the corded edge: Gently lift the corded edge with your needle before pushing it into the fabric. This will help you stay close to each line and avoid wobbly stitching.
Remember, It's Okay to Be Imperfect
Don't stress too much about being perfect. After all, you're doing hand embroidery, not using a machine!
The beauty of hand embroidery lies in its imperfections, so don't be too hard on yourself.
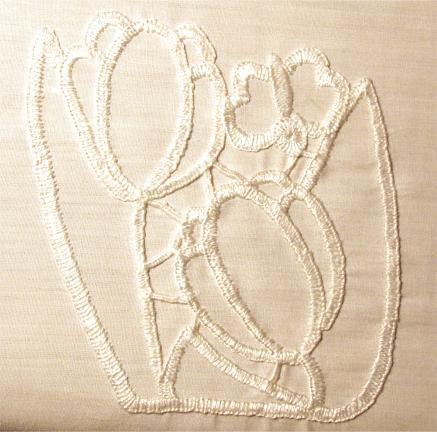
Cutting away the unwanted fabric
Once you've completed the stitching, it's time to carefully remove the excess fabric. Grab a fine-pointed pair of embroidery scissors and get ready to work your magic.
Tips for cutting
Work from the reverse side: Fold the fabric and gently snip in the centre of the unwanted area.
Slip the blade between the fabric and bars: Unfold and carefully cut, making sure not to touch the bars.
Don't worry about stray fibres: They'll disappear after washing.
The Final Touches
With the excess fabric removed, your cutwork embroidery is almost complete. Take a step back, admire your handiwork, and get ready to enjoy your beautiful piece.
Next Steps
• Take pride in your creation: Show off your skills and enjoy the fruits of your labour.
• Get hooked and start the next project: Cutwork embroidery can be addictive, and we wouldn't blame you if you're already thinking about your next piece.
You might like these
Free redwork embroidery patterns
Looking for free redwork embroidery patterns? Why not start here with this cute mother hen design
Colcha embroidery
An introduction to the technique of colcha embroidery from New Mexico
Redwork Embroidery - its history and techniques,
An overview of the history and techniques of redwork embroidery, including its origins, the Victorian era, and the modern-day relevance.


You might like these
How to embroider by hand
Let me help you learn how to embroider, with step by steps and free designs to start you off.
Learn stem stitch and variations of this basic embroidery stitch
This stem stitch tutorial covers the basic stitch, raised stem and portuguese knotted stem. Videos explain how to work the stitches.
Split decision? Choose how to work split stitch in your embroidery
Learn how to use Split stitch in multiple ways in your embroidery projects


Copyright © Carol Leather - 2006-2024
About Me - Contact Carol - Privacy Policy - Site Map - Testimonials
Please do not copy the content of this site. It is protected by Copyscape.