Abundance

Life with Fiber and Fiber Arts

Intro to Entrelac May 30, 2014

Filed under: fixing,how to,New pattern,Yarn review — Hannah Cuviello @ 10:26 am
Tags: , , , ,

I love striping yarns; they’re exciting, surprising, adventurous. I do, however, frequently find myself struggling to match them to a project because, when it comes down to it…I don’t really like….stripes. all that much. *sighs*

Don’t get me wrong, stripes are great, but I really, really need to be in control of them when I knit them. If I put stripes on something, I generally want to know beforehand exactly where they are going to go, what color they are going to be and how long they are going to last. (Socks are the exception to this, however, there are rare times when I am not in the mood to knit socks, or when all my sock needles have other sock projects on them.)

Note that the two preceding paragraphs present concepts that are largely antithetical. This is not lost on me. I enjoy the sense of spontaneity required in letting go and just allowing the stripes to happen as they will, but when it comes down to it, I am often disappointed with the finished item. The upshot is that I often end up beginning and then ripping out projects with striping yarns several times before just giving up and knitting…Entrelac.

If you are not familiar with it, entrelac is a knitting technique that involves creating a network of squares, rectangles, and/or triangles that are attached to each other. The end fabric looks something like this:

Entrelac in ZauberballThis bit of green loveliness is knit in Zauberball Crazy, of which, we currently have several new colors. Because the fabric is worked in a series of small squares, the striping is broken up, and, as if by magic, wherever the colors land, it generally looks pretty amazing.

Recently, I knit a fantastic entrelac shawl pattern for my LYS (available from Eva Martinsson on Ravelry).

Image

Shawl knit from Eva Martinsson’s Entrelac Shawl with Tassels pattern.

As often happens when a sample is knit for a shop, our customers decided that they really wanted to knit it (of course, that’s the point). What followed was a Summer of, “Um…where am I in this pattern?”, “Which way am I going?”. Now, don’t misunderstand, the pattern is perfectly fine. In fact, I have knit a second one since (the green pick above) and will probably knit another. Entrelac involves interacting with your knitting in a different sort of way than we are used to, and this pattern in particular puts a little bit of a spin on the technique. As a result, people who had not previously knit entrelac, but who wanted to knit that shawl, often found themselves a bit lost. What follows is an introduction to the basic concepts involved in entrelac knitting, as well as some examples of places where you might wonder something like “which way am I going?” and explanations of how to figure that out.

Before we begin, though, I would like to point out some of my favorite yarns for knitting entrelac. First, off, while you can certainly knit entrelac with any yarn, I prefer self-striping yarns. In fingering weight, we have Zauberball and Zauberball Crazy. These are my particular favorites. We also have Noro Silk Garden Sock and just a little bit of Kureyon Sock left. If you want something heavier, we have Noro Kureyon (only a few colors, but a sweater’s worth in some of them) and Cascade Casablanca. For heavier projects still, we have Rowan’s Colourscape Chunky. So many to choose from!

Now, on to entrelac!

Entrelac swatchHere is your basic entrelac swatch. Note: because it is fairly narrow, there is still a fairly robust striping pattern. In a wider project, the stripes will be more broken up, and we will see all sorts of interesting color play happening, as in the shawl above.

The following explanation will consist of:

1. The building blocks of entrelac and how they relate to each other in space.

2. The actual pattern instructions. These are very basic instructions and may differ from other patterns you have encountered in one or two ways (different increases or decreases). The basic idea, however, is the same.

3. The recipe for entrelac. Entrelac is based on a very specific series of steps. We can modify these steps to make our projects different sizes and shapes.

4. “Where am I?” – examples of situations that might give you pause and explanations of how to reason your way out of them.

Now, having worked in yarn stores for about 10 years, I know that people learn different ways which, as I often say, is OK. For some people, reading an overview of structure is not helpful. If this is you, feel free to skip right to #2 and follow the instructions. Then, if you want, you can come back and read the description of what you just did. If you like to know what you are doing before you start, full steam ahead!

1. Building Blocks of Entrelac

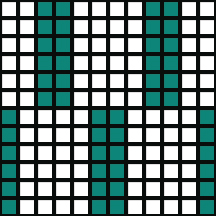
We generally think of knitting in terms of rows and stitches. With entrelac, we add two more levels of organization: Rectangles/triangles (which consist of rows and stitches) and tiers (which consist of rectangles/triangles).

The different elements:

Base Triangles: These are the triangles that line to bottom of your work (orange in the picture above). In the swatch above and in the instructions below, the stitches of the base triangles lean to the left. Take a look below to see what I mean.

entrelac_direction

Tier 1 leans to the left, tier 2 to the right, tier 3 to the left, etc.

Each base triangle begins and ends with a RS row (note that this means there is an odd number of rows). These triangles make up Tier 1.

Left Edge Triangle: You can see this little fellow on, well, the left edge of the picture above. Notice that he leans to the right. Also note that, when I say “left edge”, I mean when you are looking at the RS of your work. (Oh boy…) At the risk of sounding like an Abbot and Costello routine, I do want to point out, that when you are starting your Left Edge Triangle, you will begin with a WS row and to it will actually appear that you are working on the right edge. When in doubt, look at the RS of your work. This is the side with the knit stitches facing.

Right Leaning Rectangles: These rectangles, along with the left and right edge triangles, comprise your Tier 2 and all even numbered tiers. The stitches for these are picked up along the right edge (looking at the RS) of your base triangles (or the rectangles from the previous tier later on). You pick up stitches for these from the wrong side, and knit your first row on the RS. You will always end these rectangles on a WS row. **You don’t have to memorize this rule because the knitting will tell you what you have to do.**

Right Edge Triangle: This is the last blue arrow on the swatch above and the last element of Tier 2. It begins and ends with a RS row.

Left Leaning Rectangles: The stitches for these rectangles are picked up along the left edge of your Tire 2 (or even tier) elements, with the RS facing. The actual rectangle begins with a WS row and ends with a RS row.

Top Triangles: These line the upper edge of the piece, creating a smooth (rather than jagged) top. Sts are picked up on the RS. Each Triangle begins with a WS row and ends with a RS row (more or less)

How they relate to each other:

  I mentioned that the stitches for some elements are picked up from the edge of other elements. Here is what that looks like (sort of).

entre-PickUp
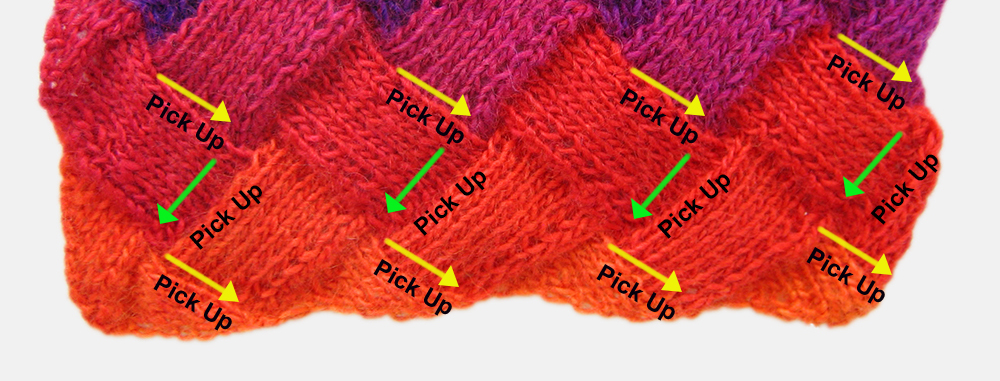
As shown above, the picking up happens from left to right for even numbered tiers. Remember, though that that is from the RS perspective. I mentioned above that we pick up stitches for Right Leaning Rectangles from the WS. Thus, we are actually working from right to left, but looking at the wrong side. Yikes.

Here’s another picture. This shows the direction of knitting within each rectangle and tier.

Entrelac_arrowsDoes that help?

I think that’s enough abstract spatial reasoning for now. Let’s just do some knitting.

2. Basic Entrelac Instructions

Tier 1: Base Triangle

CO a multiple of 8 stitches.

R1: K1, turn.

*It may feel strange to turn while you still have sts on the LH needle, but don’t worry, you’ll get used to it.

R2: P1, turn.

R3: K2, turn.

R4: P2, turn.

R5: K3, turn.

R6: P3, turn.

R7: K4, turn.

R8: P4, turn.

R9: K5, turn.

R10: P5, turn.

R11: K6, turn.

R12: P6, turn.

R13: K7, turn.

R14: P7, turn.

R15: K8, do not turn.

You have now completed one triangle. It looks kind of funny.

entrelac1

There are currently 8 sts on your RH needle. You will now ignore these sts.

Repeat Rows 1-15 once. Note that you are working on the next group of 8 sts. When you are done with the second set, you will have two groups of 8 sts on your RH needle, separated by a gap.

entrelac2

Continue repeating Rows 1-15 until you end up with no sts on your LH needle after Row 15. Tier 1 is complete. This is the point where first time entrelac knitters usually say, “That can’t be right!” and tear it out. Don’t do that!

It should look like this:

entrelac3

Moving on…

Tier 2: Left Edge Triangle, Right Leaning Rectangles, Right edge Triangle

Left Edge Triangle:

R1 (WS): P2, turn.

R2: K2, turn.

R3: Pfb, p2tog, turn. (Note that your ‘p2tog’ consisted of one st from your row and one st from the previous base triangle. On every WS row, you will be “using up” one of the sts from the group of 8 sts immediately to the left of your current sts. There will always be 8 sts in the immediate vicinity of where you are working; some will be from your current group, some will be from the previous tier.)

Two sts on the RH needle are from Pfb; two sts on the left will be purled together.

Two sts on the RH needle are from Pfb; two sts on the left will be purled together.

entrelac4b

R4: K3, turn.

R5: Pfb, p1, p2tog, turn.

R6: K4, turn.

R7: Pfb, p2, p2tog, turn.

R8: K5, turn.

entrelac5

The sts of the new section, plus the sts of the closest section from the previous tier should always add up to 8.

R9: Pfb, p3, p2tog, turn.

R10: K6, turn.

R11: Pfb, p4, p2tog, turn.

R12: K7, turn.

R13: Pfb, p5, P2tog, do not turn.

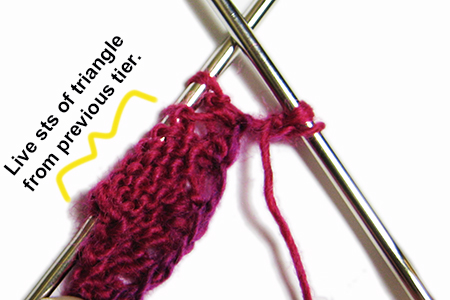
The edge triangle is now complete. There are 8 sts (the sts of the edge triangle) on your right hand needle; ignore them. Place a marker on your RH needle, to mark the boundary between the sts you have just finished with and the next section. You will probably not need this marker after a couple more rows.


Right Leaning Rectangle

With WS facing, pick up and knit 8 sts along the adjacent edge of the triangle from the previous tier.

entrelac7

If you find it easier, you can do this with the RS facing, picking up from left to right (if you find this easier, I’m guessing you are probably left handed).entrelac6

entrelac8

2 sts have just been picked up. Notice that the marker indicates the boundary between the sts of the previous section and the sts that you have just picked up.

Once the stitches are picked up, turn your work so that the RS is facing.

R1: K8, turn. (You have just knit to the marker. Soon, there will be a big gap between the sts of this rectangle and the sts of the edge triangle – which we are ignoring- rendering the marker unnecessary.)

R2: P7, p2tog, turn. (Note: your p2tog consists of one of the picked up sts and a sts from one of the groups of 8 from a previous tier.)

Repeat these two rows a total of 8 times; do not turn after the last rep of R2. At this point, there will be not more sts readily available for your p2tog. This is one way that your knitting can help you figure out what to do. If there are no more sts for your p2tog, it’s time to pick up again.

Repeat the process (from the beginning of the Right Leaning Rectangle section) until all the sts from the previous tier have been used up and there are no sts left on your LH needle after your last p2tog.

Right Edge Triangle

This is the last piece of Tier 2. Pick up 8 sts as before, this time along the last remaining available edge, and turn work so that you are looking at the RS.

R1(RS): K8, turn.

R2 (and all WS rows): Purl to 2 sts before end, p2tog.

R3 (and all RS rows): Knit to end of triangle sts (there will be a big gap before the sts of the previous rectangle), turn.

Repeat Rows 2 and 3 until only one sts remains. This stitch will stay on the RH needle and be the first of your next group of 8 sts.

Tier 2 Complete! Yay!

Tier 3: Left Leaning Rectangles

After all the hullabaloo of Tier 2, Tier 3 is relatively easy.

With RS facing and 1 st already on your RH needle, pick up and knit 7 sts from the adjacent edge.

R1 (WS): P8, turn.

R2: K7, ssk, turn. (Note: the ssk consists of one picked up st and one of the 8 sts from the previous tier’s rectangles).

Repeat Rows 1 and 2 until all sts of previous rectangle have been used up.

Repeat this process (picking up 8 sts along subsequent edges) until all groups of 8 sts have been used up and there are no more sts on the LH needle.

Tier 3 accomplished!

Now, repeat Tiers 2 and 3 until your piece is long enough, ending on Tier 2.

Top Triangles

One st remains on RH needle from last triangle; this counts as first picked up st. Pick up and knit 7 more sts (8 sts total).

R1 (WS): P8, turn.

R2: Ssk, k5, ssk, turn.

R3: P7, turn.

R4: Ssk, k4, ssk, turn.

R5: P6, turn.

R6: Ssk, k3, ssk, turn.

R7: P5, turn.

R8: Ssk, k2, ssk, turn.

R9: P4, turn.

R10: Ssk, k1, ssk, turn.

R11: P3, turn.

R12: Ssk, ssk, turn.

R13: P2, turn.

R14: Sssk, turn.

R15: P1, turn.

R16: Ssk, do not turn.

Repeat from beginning of top triangle section until all sts on LH needles are used up and only one st remains on RH needle. BO remaining st.

3. Recipe for Entrelac

So there we go. You can use these instructions to make a scarf or shawl. Now, you might wonder, how wide can I make this shawl or scarf? What if I want my rectangles to be bigger?

The second question is the easiest to answer. Remember how you cast on a multiple of 8 for the practice swatch? And then, you always started each section with 8 picked up sts? And the number 8 just kept showing up everywhere, like in the very last row of your base triangle instructions? Well, that “8” can be any number you want, all you have to do is continue working in the pattern established in the instructions.

As for the second question, you will adjust your cast on  to get your scarf/shawl/wrap to whatever width you want. You may have to do some swatching to figure out how many more sts to cast on, though.

 4. Where am I?

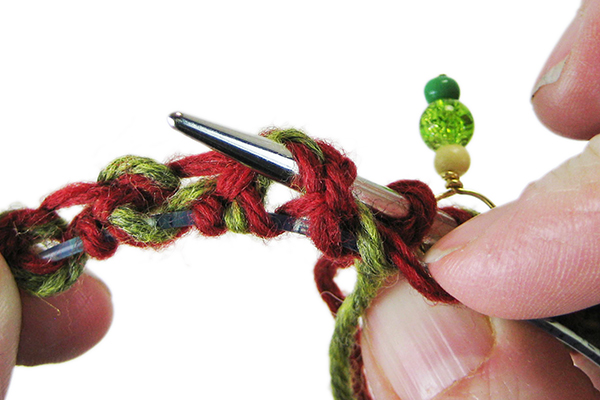
Earlier in the post, I made certain wild claims that entrelac fabric can actually give you very useful clues about where you are in the pattern.  I have put together some examples of questions people have brought to me in the past and how we talked our way through them.

First:

WhereAmIYou can’t really see it in this picture, but the yarn is coming off the right hand needle, so we know that we are on a WS row, or just getting ready to turn.

How do we know which one it is? Let’s have a look at the RS.

Note: when in doubt, I like to look at the RS, just because I find it a little easier to get my bearings. In general, it is never a bad thing to just pause and take a look at the big picture of your knitting. It is really easy to get lost in the little details, but often, when you take a look at what is surrounding the details, things become a little clearer.

WhereAmI2Once I’ve turned things around, I look at my groups of sts. I have a group of 8 (which is to be expected), a group of 7, and a group of 9. Notice that they all add up to a multiple of 8 (my magic number for this swatch). Any time you have 3 distinct groups of sts in the immediate vicinity of each other, they will consist of the following:

The sts you are currently working on (your current section).

The sts of the section you just finished.

The sts of the adjacent section from the previous tier.

The trick is to figure out which one is which. Well, clearly, the middle section (7 sts, plus one on the other needle) are your current sts. We know this because there are very close to the picked up edge, as opposed to the other groups, which have whole sections attached to them. The sts to the right (the group of 9, although one of those belongs to the current section) are the same color as the current sts. This indicates that these are from the section that you just finished knitting. That means that the group furthest to the left in the picture above are from a previous tier.

So now we know what’s what. How do we know what to do? We know that we have to get that 8th st into the center section. The question is, do we purl on and turn, (remember that we are actually on a WS row), or do we p2tog. We need to figure out if we are working on a right leaning or left leaning rectangle. Look at the 8 sts from the previous tier rectangle; their rectangle is leaning to the right. Just next to it is another rectangle leaning to the right. That is the rectangle that we picked up our current sts from. This means that we are currently working on a left leaning rectangle. Now, look at the instructions for the left leaning rectangle (repeated hear for your convenience):

R1 (WS): P8, turn.

R2: K7, ssk, turn. (Note: the ssk consists of one picked up st and one of the 8 sts from the previous tier’s rectangles).

Well, on the WS rows, we just purl, with not decreases at all, so when we see this:

WhereAmI

we know we need to purl one more (to complete the 8) and then turn.
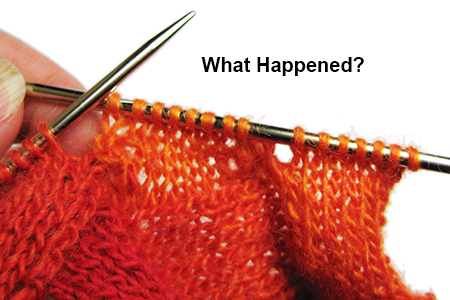
What about this?


What happened?

What happened?

This happens all the time, so if you find yourself in this situation, know that at least you are in good company.

You are working on a left leaning rectangle. See that line of Ssk’s that are eating up the sts of the previous tier? Notice that you have just knit past them. You just got a little carried away and forgot to ssk and turn. To fix this, undo the last 6 knits, ssk and then turn.

And what about this?

What Happened?

What Happened?

This is a little bit more involved. Again, we are on a left leaning rectangle, specifically, at the end of a RS row. Normally, we should be doing a decrease here, but what is this?

Whathap2
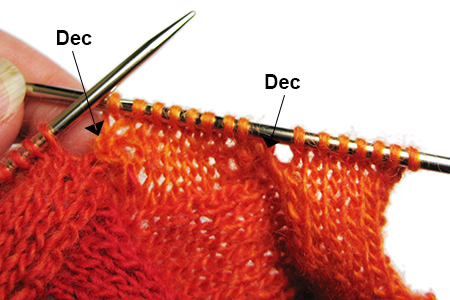
We appear to have decreases on both sides! Also, the section on the right has only 7 sts.

On the last WS row, I accidentally did a p2tog, then turned. I need to undo this whole row (8 sts, including the decrease), turn and then work the RS row of my rectangle.

There we go! everything is fixable. The important thing, though is to catch mistakes like these as soon as possible. We do this by taking time to stop and look at the project as we go along. Note: this is it’s own reward, since our projects are very pretty.

Do you have an entrelac project that is stuck? Send me a pic and we’ll see if we can get it figured out!

Have fun!


Waffles! February 18, 2014

Filed under: designs,New pattern,Uncategorized — Hannah Cuviello @ 1:03 am

Continuing on the theme of fast things to knit when the weather is chilly, I wanted to share a work in progress. A couple of years ago, I wrote a fun little vest pattern, had it photographed, but never got it to the test knitting stage. I have decided to trot it back out. It still hasn’t gotten to the test knitting phase, but I do like it, so if anyone wants to take the chance, here it is. I knit it a second time, using the instructions I had written (although, I’m generally not one to actually follow instructions). I hope someday to have a nice shiny, edited version of this, but it will probably not happen until I am out of school. When it does, you will be able to download the pattern at my website, http://www.abundantyarn.com. Until then, I hope you enjoy!

Image

Waffle!

by Hannah Cuviello           

This is a delightfully gooshy garment, designed with outdoor adventures in mind. The oversized collar can be worn up (for extra warmth) or down, and ribbing at the back of the collar snugs it close and keeps the chilly breezes off. The modified Waffle Brioche Stitch just begs to be snuggled into on a cold day and the simple construction allows for all sorts of personalization.

photographer: Andrea Parrish Geyer for Hydra Creations (green model) and Jim Lynn for Abundant Ideas (Taupe Model)

Sizes: 

To fit Bust: 30[34, 38, 42, 46, 50, 54] inches  (shown in size 34, green and 38, taupe)

With 4-5” ease

FINISHED MEASUREMENTS
Chest: 34.75[38.5, 42, 47, 50.75, 54.25, 58] inches
Length (for long version): 25[25.5, 26, 26, 26.5, 26.5, 27] inches

MATERIALS

Cascade Yarns Lana Grande [100% wool; 87yds per 100g skein]; #6022: Cucumber; 6 [6, 7, 8, 8, 9, 10] skeins for long version, 3[3, 4, 5, 5, 6, 7] for cropped version.

1 32-inch US 15/10.0 circular needle or size to obtain gauge

Stitch Markers

2 med (4-6 inch or so) stitch holders

Zipper (I used 24 inch zipper for the long version, but snipped an inch off the top)

Tapestry needle

Sewing needle and thread (for zipper)

GAUGE

8 sts/ 14 rows = 4″ in stockinette stitch on US15/10.0.mm

6.5 sts/ 10.5 rows = 4″ in Waffle Stitch

9 sts/ 16 rows = 4” in 1×1 Ribbing

Note: Row gauge is less important, because all length measurements are given in inches / cm, rather than rows and can be easily adjusted.

PATTERN NOTES

Sizing

The waist shaping in this garment is achieved by changing stitch pattern, without the use of increases or decreases. If you would like more or less definition in the waist, you can go up or down in needle size in the ribbing section.

Special Abbreviations

K3tog             knit 3 together; as part of the Waffle stitch pattern, this refers to a knit and 2 yo’s. If intended otherwise, I will specify.

Slyo                slip the next st as if to purl, at the same time bringing the working yarn from front to back over the needle, creating a paired st and yo.

Sl2yo              slip the next st and its paired yo as if to purl, at the same time creating a 2nd yo, as described above.

Wyif               with yarn in front


Waffle Stitch

Over odd number of sts:

Row 1 (Set up): *Slyo, k1; rep from * to last st, slyo.

Row 2 (Set up): Sl2yo, *k1, sl2yo; rep from * to last st.

Row 3 (WS): *K3tog (2 yo’s and slipped st), slyo; rep from * to last st (a knit and 2 yo’s), k3tog.

Row 4: K1 *Sl2yo, k1; rep from * to end.

Row 5: * Slyo, K3tog; rep from * to last st, slyo.

Row 6: Sl2yo, *K1, sl2yo; rep from * to end.

Repeat Rows 3-6 for pattern.

When you have an even number of sts (in cases where there have been decreases), work instructions w/in * to end.

NOTE on working stitch pattern: There will come a time when, due to decrease, your stitch pattern may shift by one stich (as mentioned in the last sentence above). It will be helpful if you can look at a stitch on your needle and predict from what you see where you are in the pattern. Here are some hints:

  • If you see a stitch with one yo, do a Sl2yo.
  • If you see a stitch with two yo’s, K3tog.
  • If you see a lone knit stitch next to a stitch with one yo, knit the lone stitch.
  • If you see a lone knit stitch next to a stitch with two yo’s, Slyo on the lone stitch.

PATTERN

Body

With US 15/10.0 mm needles, CO 61[67, 73, 81, 87, 93, 99] sts.

If making the Cropped version, skip to Waist Ribbing Section.

R1(WS): K3, work Row 1 of Waffle Stitch to 3 sts before end, sl3 wyif.

R2: K3, work Row 2 of Waffle Stitch to 3 sts before end, sl3 wyif.

Continue as est, repeating rows 3-6 of Waffle Stitch for pattern, and keeping the first and last 3 sts of every row in icord. Work until piece measures roughly 6 inches/15 cm, ending with Row 6.

Pockets

Next Row (WS): K3, work 2[2, 4, 4, 6, 6, 8], BO 8 loosely, work 10[10, 12, 12, 14, 14, 16], BO 8 loosely, work 2[2, 4, 4, 6, 6, 8], sl3 wyif.

Set body aside (do not cut yarn) and make inner pockets.

Inner Pockets (make 2)

With new ball of yarn CO 12 sts. Work St st until inner pocket measures 5.5 inches / 14 cm. Cut Yarn.

Join Pockets

Next Row (RS – should be Row 4 of Waffle Stitch): Work 1 (1, 3, 3, 5, 5, 7) sts in patt,  YO, sl the next yo, without knitting it, BO the next st over the first st of an inner pocket, slip that first st to RH ndl, k2tog, k6, ssk, k2tog (last inner pocket st and first body st after BO), work to last st before BO, ssk (last body st before BO and first inner pocket st), k2tog, k6, ssk, without knitting it, pass the last inner pocket st over the first body st and off the needle, sl the next yo, yo, work to end.

Continue working in pattern, incorporating the pocket sts (on the next row, you will K1 instead of K3tog on the pocket sts). Work 2 inches / 5 cm more ending with Row 6 of Waffle Stitch.

Waist Ribbing

Row 1 (WS): K3, *p1, k1; rep from *to last 3 sts, sl3 wyif.

Row 2: K3, *k1, p1; rep from *to last 3 sts, sl3 wyif.

Repeat Rows 1-2 for 2 inches / 5 cm.

Row 3: K3, place 3 sts just knit back on the LH ndl, k3, *p1, k1; rep from * to last 3 sts, sl3 wyif.

Row 4: K3, place 3 sts just knit back on the LH ndl, k3, *k1, p1; rep from * to last 3 sts, sl3 wyif.

Continue, repeating Rows 1-2 only for 2 inches / 5 cm more.

Upper Body

Beginning with Row 1 of Waffle Stitch, continue in pattern for 4.5[4.5, 4.5, 4, 4, 3.5, 3.5] inches / 11.5[11.5, 11.5, 10, 10, 9, 9] cm, ending with Row 6 (RS).

Next Row (WS): K3, work 13[15, 16, 20, 21, 23, 25], BO 1[1, 2, 2, 2, 3, 3], work 27[29, 31, 31, 35, 35, 37], BO  1[1, 2, 2, 2, 3, 3], work 13[15, 16, 20, 21, 23, 25], sl3 wyif.

Back

Attach yarn at right edge of back, with RS facing.

Work in Waffle Stitch, slipping the first st and knitting the last st of every row.

At the same time, decrease 1 st at each edge of every RS row 1[1, 1, 1, 1, 1, 2] times as follows:

Dec Row: Sl 1, ssk, work to 3 sts before end, k2tog, k1.

Continue working in Waffle Stitch until armhole measures 6.5[7, 7.5, 8, 8.5, 9, 9.5] inches / 16.5[18, 19, 20.5, 21.5, 23, 24] cm, ending with a WS row.

Next Row (RS): Sl1, work 6[6, 7, 7, 8, 8, 8], BO 11[13, 13, 13, 15, 15, 15], work to last st, k1. Do not cut yarn.

Left Shoulder Shaping

Row 1 (WS):  BO 2 sts, work to end.

Row 2(RS): Work to end.

Row 3: BO 2[2, 3, 3, 3, 3, 3], work to end.

Row 4: Work to end.

Row 5: BO rem sts.

Right Shoulder Shaping

With WS facing, attach yarn at neck edge.

Row 1: Work to end.

Row 2: BO 2 sts, work to end.

Row 3: Work to end.

Row 4: BO 2[2, 3, 3, 3, 3, 3], work to end.

Row 5: Work to end.

Row 6: BO rem sts.

Right Front

With RS facing, attach yarn at neck edge. Beginning on Row 4, work in Waffle Stitch, decreasing 1 st at armhole edge every RS row, 1[1, 1, 1, 1, 1, 2] time(s). Continue until armhole measures 4.5[5, 5.5, 6, 6.5, 7, 7.5] inches / 11.5[13, 14, 15, 16.5, 18, 19] cm, ending with a RS row. Make note of the last pattern row worked. I’m not kidding.

Next Row (WS): Work to end. Cut yarn and place the last 7[9, 9, 13, 13, 15, 15] sts worked on holder.

With RS facing, reattach yarn at neck edge (to the left of the held sts) and work to end.

Continue in pattern on the Right Shoulder, decreasing 1 st at the neck edge every RS row 1[1, 1, 1, 1, 1, 2] times, until the armhole measures 6.5[7, 7.5, 8, 8.5, 9, 9.5] inches / 16.5[18, 19, 20.5, 21.5, 23, 24] cm, ending with a RS row. Make note of the last pattern row worked.

Right Front Shoulder Shaping

Row 1: BO 2 sts, work to end.

Row 2: Work to end.

Row 3: BO 2[2, 3, 3, 3, 3, 3], work to end.

Row 4: Work to end.

Row 5: BO rem sts.

Left Front

Attach yarn at RS armhole edge. Beginning on Row 4, work in Waffle Stitch, decreasing 1 st at armhole edge every RS row, 1[1, 1, 1, 1, 1, 2] time(s). Continue until armhole measures 4.5[5, 5.5, 6, 6.5, 7, 7.5] inches / 11.5[13, 14, 15, 16.5, 18, 19] cm, ending with a RS row. Making sure to stop at the same point in the pattern as you did for the Right Front.

Next Row (WS): K3, work 4[6, 6, 10, 10, 12, 12] sts and place the sts just worked on holder, work to end.

Continue in pattern on the Left Shoulder, decreasing 1 st at the neck edge every RS row 1[1, 1, 1, 1, 1, 2] times, until the armhole measures 6.5[7, 7.5, 8, 8.5, 9, 9.5] inches / 16.5[18, 19, 20.5, 21.5, 23, 24] cm, ending with a WS row. Stop 1 Row after the point when you stopped on the Right Front Shoulder.

Left Front Shoulder Shaping

Row 1 (RS): BO 2 sts, work to end.

Row 2: Work to end.

Row 3: BO 2[2, 3, 3, 3, 3, 3], work to end.

Row 4: Work to end.

Row 5: BO rem sts.


Sew Shoulder Seams

Collar

With RS facing, attach yarn at right front and work across 7[9, 9, 13, 13, 15, 15] held collar sts, working Row 1 of Waffle pattern, and keeping the first 3 sts as i-cord (treat slyo’s from last row worked as a single st). Note: you will have an even number of pattern sts, so work only the instructions in the *. PM, PU 6 sts along the right front neck, pm, PU 11[13, 13, 13, 15, 15, 15] sts along back neck, PM, PU 6 sts along left front neck, pm, work 4[6, 6, 10, 10, 12, 12] held sts of left front collar in pattern, end sl 3 wyif. 37[43, 43, 51, 51, 57, 57] sts.

Next Row: K3, work Row 2 of Waffle Stitch to 2nd marker, *k1, p1; rep from * to next marker, work Row 2 of Waffle Stitch to last 3 sts, sl 3 wyif.

Continue in pattern, repeating Rows 3-6 of Waffle Stitch and working K1,P1 ribbing between the back neck markers, as est, until collar measures 4 inches /10cm. At the same time, work pattern Row 4 as follows when you come to it:

Row 4: K3, work to 1 st before 1st marker, k3tog (meaning the lone stitch, the next group of st and yo’s and the following lone stitch), replace marker to right of st just made, work to next marker, work ribbing, work to 2 sts before last marker, k3tog (as at the last marker), work to 3 sts before end, sl 3 wyif.

Repeat this process the next time you reach a Row 4 (2 times total).

Once collar has reached 4 inches/10cm, work the next two odd numbered rows as follows:

Next Row: Work to 2nd marker, removing markers as you come to them, kfb, work Waffle Stitch to end, removing markers as you come to them.

Continue in Waffle Stitch over all sts, until collar measures 5 inches/13 cm from top of ribbing, ending with an odd numbered pattern row.

Work i-cord BO as follows:
*Knit 3, place 3 sts just knit back on LH ndl; rep from * 2 times more.

Row 1: K2, ssk (one i-cord st and one collar st), place 3 sts just work back on LH ndl.

Row 2: K2, ssk, place 3 sts just work back on LH ndl.

Row 3: K3, place 3 sts just work back on LH ndl.

Repeat Rows 1-3 until all collar sts have been used up and only the 3 i-cord sts from the left edge remain. Work Row 3 once more. Cut yarn, leaving 5 inches /13 cm and graft to edges of i-cord together.

FINISHING

Weave in all ends and block. Sew down sides and bottoms of inner pocket. Prewash zipper, then sew it to the underside of the i-cord edging. I chose to begin the zipper at the bottom edge of the ribbing.

Feel free to contact me if you have any questions. I will try really hard to get back to you.

Best!

Hannah

Image


Immediate Needs

Filed under: Uncategorized — Hannah Cuviello @ 12:44 am

     This last January, we had quite a cold patch (if you are reading this in the Midwest or on the East Coast, I rescind that statement; it was comparably balmy here). At any rate, I found myself in need of something warm, fast. Disregarding my usual inclination to cast on a sweater, I decided to try my hand (or arms, rather) at Arm Knitting. I was reluctant at first. I had previously shrugged this off as a silly fad, but the allure of a super bulky scarf in 20 minutes was more than I could resist when it was so few degrees out.

Image

Arm Knit in Cascade Magnum Paints

I have to say, I was quite happy with the results. In spite of the gigantic stitches, the cowl is really warm and the process, it turns out, is a fun, mind bendy little exercise. While there are a few YouTube videos out there, I thought it might be fun to go through the steps as well. Here we go.

As with most knitting projects, the arm knit cowl starts with a cast on. In fact, I started mine with the Knit Cast On, the same one that I would use were I knitting with needles. I begin casting stitches onto my left arm. Now, I should say that I am left handed. I don’t know if that really makes any difference, but, if you find that what you have been doing is different, or what someone else is doing is different, let’s blame that. The decision to cast on to my left arm, however, has nothing to do with my handedness. We generally cast onto our left needle when knitting and, while we will be working off both our left and right arms, I wanted to start us out with something familiar. (click on the image to see it larger)

ImageOnce I’ve cast on as many stitches as I need, I begin knitting. Moving on…

Row 1.

ImageSee, it’s just like the other kind of knitting. Well, there is one little difference. The way I have placed the new stitches on my right hand, the left leg is in front of my are (normally, at least for me, the right leg would be in front). Just saying. You can really let the stitches sit however you like on your are. The important thing is that, when you begin your next row, you need to reach through whichever leg is closest to the working yarn.

Row 2.

Image

There we go. Repeat rows 1 and 2 until you are just about out of yarn, then bind off. The bind off is really exactly the same for arm knitting as it is for needle knitting. While you can start the bind off with the stitches on either the right or left arm, starting with them on the left arm will be a little closer to what you are most likely used to.

Image

At the end, cut the yarn, leaving enough of a tail to sew the two ends together if you want a cowl.

That’s it. 20 minutes. Bam! Cowl. I used one skein of Cascade Magnum Paints, held double. To do this, I wound the yarn into a cake and used both ends. This can potentially lead to a little bit of a tangle, but it’s not like it will last very long. These Arm Knit scarves are also a great way to use up odds and ends.

Have Fun!


“Because I Can” Knitting November 28, 2013

Filed under: Uncategorized — Hannah Cuviello @ 2:53 am

I often talk about the different kinds of knitters we encounter out in the world. I don’t mean how one knits, as in English vs. Continental, etc. (although I talk about that as well). I mean more what drives a person to knit: wanting a particular knitted garment (product knitters), wanting to engage in the act of knitting for its own sake (process knitters). Of course, there are various mixes of the two. The latter group can be further broken down into those knitters who are seeking something repetitive and soothing to pass the time (therapeutic or meditative knitters),  and those who are looking for a mental challenge and wanting explore the kinds of shapes and spatial manipulations they can create with string. I call this last subgroup “Because I Can” knitters. These knitters are often very spatial thinkers and problem solvers. They often look at knitting as a puzzle. I identify with each of these groups and have been driven in my knitting by each of these impetuses* at one time or another, as I think many knitters have.

*That is the correct plural of “impetus”; I checked.

The pattern I am sharing today, a moebius brioche rib cowl, is the product of a Because I Can episode.

Moebi - a moebius brioche cowl

Moebi – a moebius brioche cowl

Here is how it came about.

I had a couple skeins of Cascade’s Casablanca, one each in two different colors. (Really, I had unlimited skeins, because, you know, I have a yarn store – but I limited myself to two). There was no question about what I was going to do; I would knit a two color brioche cowl. I love working two colors of striping yarns against each other and brioche rib is the a great way to play with that effect, combining the shifting horizontal striping of the yarns with alternating vertical stripes of each color. Now, there are plenty of two color brioche cowl patterns out there, but I think I have discussed my “using another person’s pattern” issues before (and this all happened before I was in school, so I was still having these sorts of “I should design it myself feelings). Also, I thought it would be really neat if the stripes were more or less symmetrical, that is, the top the same color as the bottom and stripes matching moving toward the center. Obviously, it would have to be a moebius cowl (the kind that is worked from the center out, not just the twisted kind). Again, there are plenty of great moebius resources out there, and I did try several of them, but I was not happy with the transition from the cast on to the stitch pattern. Brioche is, you see, a very gooshy stitch and moving from a regular cast on right into it leaves a bit of a gap. In a regular garment, this isn’t too much of an issue, but when the pattern is growing from both sides of the cast on it doubles the effect, and I wasn’t happy.

The natural solution was to cobble together a Two Color Brioche Moebius Cast On. Now, I think this is perfectly reasonable cast on, and I honestly feel that the number of words in its descriptive title belies the actual difficulty level of the cast on itself. Still, when I have presented the pattern to prospective test knitters, they have shown a certain degree of trepidation.  The pattern as it is presented on the website has a photo tutorial on the cast on, but the pictures aren’t quite as clear as I would like and, for space considerations, I had to separate the instructions from the pictures. So, I have rephotographed the process and will show it to you step by step. Here is the finished result. I, for one, think it’s worth it. If you absolutely disagree, I have non-moebius alternative instructions at the end of the post.

I think it's worth it.

I think it’s worth it.

There are two basic parts to this cast on. Here we go.

Part 1: Two color cast on.

This is actually a take off on the Knit Cast On, which I don’t necessarily think I have described on my blog, but which is one of the more standard cast ons and can be found in most knitting books and in roughly a billion different places on the internet. If you haven’t come across it before, you should look into it; it’s very handy.

1.1 Start with a Slip Knot in CC (Contrast Color), placed on your LH (Left Hand) needle.

2C_CO_1

Slip Knot sitting on Left Hand needle

1.2 Insert your right hand needle into this stitch as thought to knit it and, holding your MC (Main Color) with your CC, knit the stitch with both colors (that is,  yo with both colors and draw the two color loop back to the front of the original stitch, as you would were you knitting it). If this doesn’t make sense, look at the picture.

On the RH needle is a loop of both CC and MC.

On the RH needle is a loop of both CC and MC.

1.3 Bring your LH (left hand) needle around to the back of the two color stitch  (or bottom or far side or right side – look at the picture and describe it in a way that makes sense to you).

I think of this as picking up the stitch "from behind".

I think of this as picking up the stitch “from behind”.

1.4 Place the two color stitch on the LH needle.  You can withdraw the RH needle and them put it back in to make the next stitch, or you can save a step and keep it there, because it is in the right position for making a new stitch anyway. Either way, you now have two stitches: one of CC only and one of CC and MC held together.

Two stitches made; ready for the next one.

Two stitches made; ready for the next one.

1.5 YO with CC and draw it through, making a third stitch.

Stitch # 3, CC only.

Stitch # 3, CC only.

1.6 Place stitch #3 on the LH needle as before, from behind.

Placing stitch #3 on LH needle.

Placing stitch #3 on LH needle.

1.7 Repeat steps 1.2 – 1.6, building up stitches on the LH needle. Remember, your new stitches alternate between CC only and CC held together with MC.

10 sts on LH needle. Count them and see if you get that number.

10 sts on LH needle. Count them and see if you get that number.

1.8 Continue this process until you have cast on the prescribed number of stitches (150 in the pattern). Your last stitch should be a two color stitch (that is, you will end on step 1.4. Place a marker on the needle; this marks the halfway point of your round. Note: your stitches will not fill up your entire needle at this point. If they do, you may need a longer needle.

Halfway Point (not really 150 stitches, though, because this is just an example).

Halfway Point (not really 150 stitches, though, because this is just an example).

Part 2: The Moebius Stuff

2.1 Position the needles so that the yarns are coming off the RH needle and the bottom of the cast on (the knotted edge) is traveling around the inside of the needle loop, not crossing over it at any point (that comes later).

Yes, this is the same as the last picture.

Yes, this is the same as the last picture. Note: the strands coming off the LH needle are the ends. Ignore them.

2.2  Let’s just take a closer look. Again, the two strands of yarn coming off the LH needle are just your ends, so ignore them. The working yarn is coming off the RH needle.

Notice the bumpy bottom edge. The "top" of the cast on consists of the actual stitches sitting on the cord.

Notice the bumpy bottom edge. The “top” of the cast on consists of the actual stitches sitting on the cord.

2.3 Now, rotate the bottom bumpy edge of the stitches on the LH needle so that they are sitting on top of the needle.This will be a 180° rotation. Before you yell at me that this doesn’t make sense, look at the picture.

The bumpy edge is now on top.

The bumpy edge is now on top.

2.4 Notice that, below the bumpy edge, there are loops. These loops alternate between a single strand of CC and a double strand of CC and MC. They are just like any other stitch, except they are upside down. Holding working yarn in back, insert the RH needle into the first (CC) stitch from front to back. The working yarn is not pictured below because it is being held out of the way behind the RH needle stitches.

See the bumpy edge with the CC loop hanging off it? Put the needle through the loop.

See the bumpy edge with the CC loop hanging off it? Put the needle through the loop. The yarn strands in the picture are the ends. Ignore them (I should have photoshopped them out).

2.5 Here is a close up of the RH needle in the upside down stitch, because more pictures can’t hurt. In the background, you can see the CC working yarn, gearing up for action.

Here

Close up!

2.6 With CC, knit that upside down stitch. That is, YO with CC and pull that loop back to the front of the work. Just as though you were knitting into a right side up stitch. You have now completed the first stitch of the second half of your Cast On. Take a close look. Do you see where the next upside down stitch is? It’s a two color stitch with MC and CC…and it’s upside down, but we don’t care about that. That isn’t messing us up at all. It’s just like regular knitting. So all is copecetic? Good, because shit’s about to get real.*

First stitch of the second half.

First stitch of the second half. See how we put our marker there?

*That’s a funny joke because this is all just knitting.

2.7 Bring both CC and MC to front. I realize that this sort of covers up that next MC/CC stitch we were looking at, but don’t forget where it is.

Yarns in front.

Yarns in front.

2.8 Now, find that little MC/CC stitch we were looking at. Insert your RH needle under the bumpy edge of that stitch from back to front. This feels a little weird and awkward. I totally get it.

Do you see our little working yarns in front there?

Do you see our little working yarns in front there?

2.9 Next, you will YO with MC (just MC) and bring that loop back to the back. That is, you have just purled that stitch with MC. Next bring MC to the back, between the needles, like you would do if you were switching from knit to purl (which, in effect is what you are doing). CC is still hanging our in front.

Little CC is still hanging out in front.

Little CC is still hanging out in front.

2.10 Bring CC to the back by passing it over the needle. In other words, YO with CC.

YO with CC

YO with CC. See that MC is passing under the RH needle, but CC is passing over the RH needle. Both strands are in the back now.

2.11 (we’re almost done!!) Now, repeat steps 2.4-2.10 until all the upside down stitches have been knit or purled into. If, when you come to a stitch, the bumpy edge is not on top, you may have to rotate it a little bit to get it in the right position. If this is the case, always move it the smallest amount possible to get it back to where it should be (the top). For example, if the bumpy edge has slipped toward you a little bit, don’t move it down around the needle, to the back and then to the top (I don’t really think you’d be able to anyway), just scootch it away from you towards the top of the needle.

When you have used up all your stitches, you will notice that you have returned to the general vicinity of your halfway marker. Notice, though, that the halfway marker is hanging below your needle tips from a lower loop of cord….

All upside down stitches have been knit or purled and we are back at the marker.

All upside down stitches have been knit or purled and we are “back at the marker”…sort of.

2.12 Your needle, at this point, should look to be roughly half it’s original diameter. This is because it is doubled. One half holds the original stitches, while the other half holds the stitches that we knit or purled into the upside down stitches. As you begin to knit, you will work the original 150 stitches, then the 150 stitches that are growing out of them. Your knitting, instead of growing lengthwise or widthwise or on the bias, will be growing from the center out. If you haven’t knit in a moebius before (bravo for making this your first crack at it!), this may not make much sense. Give it a few rounds.

Double loop of cord; each loop has 150 sts on it.

Double loop of cord; each loop has 150 sts on it.

2.13 Before continuing on with the pattern, (and it really does get easier from here), place another marker. Preferably, choose a marker that looks significantly different from your halfway point marker. This is your actual end of the round marker. In the pattern, each round is divided into two sections, corresponding to the two sets of 150 stitches.

Beginning of the Round Marker.

Beginning of the Round Marker.

Now, let’s have another look at the finished project. Think about its structure in relation the the process of casting on. Do you see how it grows from the center out? Can you see the center line that is where the cast on started?

See the center Cast On line?

See the center Cast On line?

Now, you may not be into 21-step Cast ons, and I totally respect that. If that is the case, I have an alternative for you.

Notice that the bind off I use is an i-Cord Bind Off. Instead of going to all the trouble of the moebius cast on I described above, you can make a twisted moebius with an i-Cord Cast On at the beginning and i-Cord Bind Off at the end. You would adjust the pattern as follows:

With US 13/9.0mm needles and MC, CO 150 sts using i-Cord Cast On (see earlier blog post for instructions).

Cowl

Work Set Up Round as follows:

Set Up: *With CC, p1, yf, sl1/yo; rep from * to end.

Note: Continental knitters may find the “yf” instruction redundant.

Rnd 1: Work Rnd 1 instructions of pattern from * to * for entire round.

Rnd 2: Work Rnd 2 instructions of pattern from * to * for entire round.

Repeat Rnds 1 and 2 until cowl is desired depth (roughly 7 inches). Bind off using i-Cord Bind Off as described in pattern.

Well, that was fun. I hope you give the tricky cast on a try. Remember, it’s just yarn; nothing really bad can happen.

If you are looking for some color ideas, here are Casablanca combinations I would like to see put together:

cascablanca-pairings


Making Changes November 3, 2013

Filed under: Uncategorized — Hannah Cuviello @ 11:45 am
Tags:

First off, we are not going to say anything about how long it’s been since my last post. I am not at all embarrassed about it.

Secondly, I can unfortunately make no promises about future posts. I just started school full time (I’m loving it, thank you!) and, unless I have some super pressing assignment or test to study for and I convince myself that writing a blog post is a good way to procrastinate*, I don’t how I will possibly find the time. That said, here is a little something.

I have stepped back from designing knitwear for the time being. While I was aspiring to be a designer, I could never quite get myself to knit a pattern that wasn’t my own. Since I have not been gifted with very many extra hours in the day, and have never been particularly swift in the designing process (God forbid I design something in just one size! If I’m going to design something, I had better give it graded sizing and have it ready for publication. Otherwise, why bother?), I have relatively little to show for my past few years of knitting (besides boxes of swatches and projects still waiting for me to finish the design).  I am letting go of that. With school, I have little enough knitting time that I can’t afford to waste it on wringing knitting instructions out of my tired little brain. Still, I can make changes to existing patterns to make them just perfect for me. That is what this post is about.

*Today’s post is brought to you by Not Studying for Neuronatomy.

Tips for tweaking existing patterns.

I’ve made reference in the past to different kinds of knitters. There are those of us who knit for a challenge. There are those of us who knit to relax, those who knit because we are cold, those who knit for the having of a specific end product. Some knitters think of  a thing and then just knit it; some knitters really want to be told each step of the process. There are various combinations of the above. I mention this because the following topic will be of no interest to certain of those knitters. If it doesn’t apply to you, sorry, I’ll get you next time.

Many knitters I know have a favorite sweater pattern – a basic, wearable sweater they can (and do) knit again and again. Sometimes, though, they want to change it up a bit; add some cables, maybe ribbing or lace, a button band instead of a zipper, a shawl collar instead of a v-neck. For some adventurous knitters, this sort of thing comes naturally. The fact is, though, that everyone is different, and there are many excellent knitters who are not comfortable leaping out into uncharted (knitting pun!) territory. This is just fine! Working at a knitting store, I encounter all of the wonderful varieties of knitter. This post is geared toward the knitter who can follow a pattern, is just adventurous enough to imagine the pattern with some other feature and just needs the groundwork to be able to add that feature themselves. Below, I have a couple of things to think about when making modifications to a knitting pattern. I hope they are helpful.

NOTE: The process I am about to describe is not the same as designing and IN NO WAY am I suggesting that anyone take a pattern published by someone else, slap a cable on it and call it their own design! These modifications should be for your own enjoyment.

Anyway…here are some questions to ask yourself as you embark on this little foray into playing with your knitting.

1. What kind of sweater are you going to modify?

Some basic sweater patterns lend themselves very well to modifications. A no-frills drop shoulder pullover (basically two squares and a couple of rectangles sewn into the shape of a sweater) is the perfect blank slate.

Personally, I enjoy starting with a top down sweater pattern. These are fun to modify because you can adjust the fit as you go (more on that later).

Warning, if you are looking to modify a sweater with interesting shaping (eg. side to side knit, circular yoke) there is going to be a lot more math!

2. How are you going to modify it?

While there are plenty of ways to modify a sweater, I am just going to talk about the basics of adding a stitch pattern. I find it helpful to start with a schematic.

I didn't include sleeve schematics because Lazy

Drop Shoulder Schematic: I didn’t include sleeve schematics because Lazy

So, here’s the scenario: You have a basic drop shoulder, stockinette stitch sweater pattern for chunky yarn, but you really want a drop shoulder sweater in Mistake Rib. I don’t blame. It’s a gooshy, delicious stitch pattern that is perfect for snuggling into next to the fire with a good book.

This is the schematic for the body (I’m too lazy to do the sleeves, too. Sorry) of a basic drop shoulder sweater. Hopefully, the pattern you are modifying will include a schematic, but if not, you can use the finished measurements in the pattern to draw one.

Next, knit a swatch of the stitch pattern you want to insert in the yarn you want to use. If you are feeling like a very good knitter, you could block your swatch too.

You find that, after blocking, your Mistake Rib gauge is 3.5 sts/in.

It’s time for Math. My sweater front is 22” (as is the back). Here’s what you do:

Gauge x measurement = Cast on…sort of.

3.5 x 22 = 77

OK, that’s a start. Now, let’s look at the stitch pattern in question.

Mistake Rib (mult 4+3)

Row 1: *K2, p2; rep from *, ending k2, p1.

Repeat Row 1.

(Incidentally, this is a great, super easy, stitch pattern for a scarf. It’s attractive, gooshy and doesn’t roll.)

Notice next to the name of the pattern, it says “Mult 4+3”. This means that your cast on has to be, well, a multiple of 4, plus 3. For example, 15 (4×3+3) or 47 (4×11+3). Now, let’s look at the cast on number we came up with. Is that a multiple of 4 + 3? Nope. So, we tweak the numbers a little. 76 is a multiple of 4, so let’s add 3 to it and call it good. Our cast on is 79. Easy. Now we just knit until it is the appropriate length.

3. Navigating Shaping

“Wait!” you say, “What about the neck shaping?!” Again, there is a little bit of math you are going to have to do. Notice that the back of the neck is 8”. With our gauge of 3.5 sts/in, the final neck width is going to be about 28 sts. Now, we don’t necessarily have to worry about stitch multiples at this point because you will have been knitting mistake rib for 15” or so and will probably have a good idea of how the stitches should be lining up. (Hint: You will have one column of knits, followed be a column that alternates, followed by a column of purls, followed be a column that alternates). Once you start your decreases, make sure to keep your stitches lining up appropriately, being aware that your row may no longer go “K2, p2; rep from *, end k1,p1”.  Not everyone is visual person, but honestly, charts can be so helpful in navigating shaping within a stitch pattern. If you can chart your stitch pattern, you can draw in the decreases and then just follow the charts. Just saying.

You will also have to determine when to start your neck shaping. Notice on the schematic, that the neck shaping starts 2” from the top of the shoulder. This means that you will knit the entire length minus 2” before you start your decreases.

So, there is a start. If you are nervous about jumping in and designing a sweater, try starting with a scarf. Figure out the dimensions you want, make a gauge swatch and do the math. Make predictions about how it will turn out. And see if those predictions pan out? If they do, it will give you a little confidence boost going into bigger projects.

4. Small Sections of Pattern Change

Let’s say that Knitter wants, more or less, a simple drop shoulder sweater, but she wants a 20 stitch cable panel running down the one side of the front and a 20 st lace panel running down the other side of the front. It is tempting to just substitute the cable and lace panels for the 20 stitch sections on either side. Let’s look at it more closely, though. (I will use the schematic above).

If her stockinette stitch gauge is 5 st/in, she has 25 sts to work with on either side of neck. Here is what she is probably envisioning.

This is what knitter is picturing.

This is what Knitter wants.

Now, remember when I said that it is important to do a gauge swatch of your pattern stitches? It turns out that cable patterns tend to “pull in” and lace tends to “open up”. This means that the overall gauge of a cable pattern is going to be less than the stockinette gauge with the same yarn (let’s say 6 sts/in), while the lace gauge is going to be bigger (let’s say 4 sts/in). This means that her 20 stitch cable and lace panels are actually going to measure 3.3″ and 5″, respectively. This is what she is going to end up with:

This is what Knitter gets.

This is what Knitter gets.

Notice that the 5 stitches of Stockinette on either side of the neck line still yield 1″ of fabric, but the stitch patterns take up more or less room than expected. This places the neckline off center by about an inch. Now, asymmetry has enjoyed  bit of popularity recently, but I frequently find that asymmetry as subtle as this ends up reading as more of a mistake than a design element, as in this case it was. If Knitter is happy with her off center neckline, awesome. If she really wanted a centered neckline, here is what she could have done:

Knit swatches and measure the gauge of her cable and lace panels, finding that they measure 3.3″ and 5″, respectively when knit over 20 sts. If she really only wants a 4″ lace panel (as in the “What Knitter Wants” picture above), adjust the stitches in the lace panel. Adjust the number of Stockinette stiches on either side of the neckline to make up for the difference in the pattern stitch panels.

So that’s that.

5. Other kinds of sweater Patterns

I mentioned above that I like starting with a top down sweater pattern. I am a little less organized in my process when adjusting these patterns because, well, they allow me to be. With the drop shoulder sweater, you have to know your cast on beforehand. With a neck down raglan, you keep increasing until the sweater is the size you want.

Here’s how it works:

You cast on for the neck and place four markers in various places as specified by your pattern. These markers signify the boundaries of the raglan lines. What?

Cast on for the neck and place your markers (blue lines). Notice that these markers divide your knitting into 5 sections; the two fronts, the two sleeves, and the back.

CO_MarkersIncrease on each side of each marker every right side row (also increase at the beginning and end of the row, intermittently to shape the neckline). This will cause each section to grow outward.

TopDownIncreasesWhen you are adding stitch patterns, first think about how you want the pattern centered in a particular section (the sleeve or the back, for example). Recently, I knit this little baby sweater:

Baby Sophisticate +

Baby Sophisticate + Modifications

Note, this is not my pattern. This is a modification of the Baby Sophisticate by Linden Down, available through Ravelry as a free pattern for one or two baby sizes or for sale, sized for baby through child. It’s a great pattern and has been wildly popular. I wanted to knit something fun and try out our new yarn, HiKoo Simpliworsted. The truth is, though, that I get a little bored with stockinette, so I made some adjustments. Let’s talk about my process.

On my baby sweater, I did a k4, p2 rib at the back.

Baby Sophisticate - Back

Baby Sophisticate – Back

I didn’t start the back section by knitting 4, though. The back section in the pattern starts out with 14 sts (that’s what’s between the back makers in the schematic above). I knew that I wanted one of the 4 stitch knit stripes in the center of the back.

OK, 14 – 4=10. That means that there will be 10 back stitches besides the 4 in the center. 10/2=5. There will be 5 stitches on either side of my center 4. Now, we work those into the pattern. We get:

Back_ribFrom there, every time I make an increase, I make sure to add it in pattern. On my next right side row, I will add another knit to each end of the back. On the next right side row, I will add a purl.

For the fronts, I did something similar, with a slightly more complex pattern.

Baby Sophisticate Front (wavy rib)

Baby Sophisticate Front (wavy rib)

Wavy Rib (mult 6)

Rows 1, 3, 5: *p1, k4, p1; rep from *.

All even rows: Knit the knits and purl the purls.

Rows 7, 9, 11: * k2, p2, k2; rep from *.

Now, this pattern, as written, is just a starting point. If you were to make a straight scarf with this stitch pattern, you could follow the instructions above and be just fine. In this sweater, however, I am adding stitches at both sides of the fronts every other row (more or less). To have this stitch pattern work out, it is absolutely necessary that you understand how your stitches line up with each other.

This pattern is basically a K4, P2 rib. Work that for 6 rows, then shift it by 2 stitches so that your P2 is centered under the K4 of the previous section. Here is what it looks like.

Wavy_Rib

Wavy Rib: White squares are knits, aqua squares are purls.

This chart shows two repeats of the pattern. One way to work your increases into the stitch pattern is to look at the stitch from the previous row and figure out what your stitch needs to be, based on how the stitches line up. This requires a certain amount of abstract visualization. This is not everybody’s strong suit, which is totally OK. We all take in and work through information in different ways and none of those ways is bad, dumb or wrong! If you have a harder time predicting which stitch should go where, try drawing the increase lines on the chart.

  For example, let’s say we are working on the right front of the sweater. This means that there will be an increase on the right edge of the chart every other row (there would also be intermittent increases on the left edge for the neck shaping, but I am choosing not to deal with those at the moment). Let’s also say that, on our first RS row (R1), we have 5 sts on our front. The red line on the chart below represents our Right Shoulder marker. Everything to the Left of the line is our Right Front. Everything to the right of the red line doesn’t exist yet.

   A quick note on chart reading: Read Charts from Right to left (on the right side, and left to right on the wrong side) and bottom to top. Notice the placement of the row numbers in the chart below. Also, for the purposes of this description, you will only look at the stitches to the left of the red line. In other words, start at the red line and read from right to left. Take a moment to think about that. Look at some knitting. Think about it again. You encounter your stitches from right to left. If you are increasing on the right edge, you are adding stitches to the right of your existing stitches, meaning that the new stitches will be worked according to squares on the chart further to the right.

The red line shows how we add sts on the Right edge of the knitting.

The red line shows how we add sts on the Right edge of the knitting.

The marker stays in the same place for Rows 1 and 2, because we haven’t done any increases yet. On Row 3, we do one increase. While we don’t actually move the marker, we are adding a new stitch to the left of the marker. The red line corresponds to the placement of the marker with respect to the growing collection of Right Front stitches.

How are we doing? If it’s not quite clear yet, I suggest just giving it a try. Maybe knit a swatch where you increase on one side and work the new stitches into the pattern. Often in knitting, things make more sense when you do them, than when you read them.

Have fun!

FAQs

(These are things I have been asked on several occasions while working at my LYS; they are all good and legitimate questions).

What if it doesn’t work?

Try again. For all our math, sometimes things just don’t work (it could have to do with the combination of fiber and stitch pattern or changes in your knitting gauge due to stress). The worst that can happen is that you have to start again. Since knitting is fun, that’s not such a bad thing. Any time you are making things up, you have to be prepared for the possibility that is won’t turn out the way you think.

What if I don’t want to do math or swatch?

Knit the pattern as written. Alternatively, you could wing it and be prepared to re-knit if it doesn’t work out. I know many wonderful, free-spirited knitters who work this way (sometimes I do). If that is you, go for it! If you want it to be perfect the first time and still don’t want to swatch or do math, you will just have to use your magical powers.

You can also ask your LYS employee to help, but if you do, please offer to pay them for their time. They may be happy to do it, but they are there to work and, chances are, there is some stocking, pricing, helping other customers they could be doing. Their time is valuable, just like yours, and they tend to appreciate when you are respectful of that.

What if I want to knit my sweater in a completely different yarn?

There is much more that goes into the selection of yarn than gauge. There is drape (how will it hang), memory (will the stitches grow over time), fiber (different fibers lend themselves to different projects). Also consider what you like about the original pattern. If it is a big, bulky, gooshy sweater, will knitting it out of a sport weight yarn retain the qualities you like? Once you have thought about these things, we go back to math. You can use the schematic approach and use the finished measurements multiplied by your gauge to figure out your numbers. Remember with length measurements to use the row gauge, rather than the stitch gauge.

The hardest part about converting between yarns is figuring out the yardage requirements. There are two ways to approach this:

1) Go by grams. I rarely use the grams required by the original pattern when converting between yarns of the same weight. In these cases, I use the yardage. If I have a worsted weight sweater pattern that calls for 500g of yarn, however, and I want to knit it in fingering, I will probably start out with 500g of fingering. This will be a lot more yardage, but that is what you would expect. Still, this is not precise, to get extra or make sure that there is extra available.

2) Find a similar pattern in your weight and see how much it used. Again, this is imprecise and should only be used as a starting point.

Figuring out the yardage you will need is the hardest part of this process. I, unfortunately, do not have any magic fixes for it. If you do, please feel free to let me know.

Thanks! Keep up the good knitting!

Hannah


Like Magic… February 29, 2012

Filed under: how to,New pattern,Uncategorized — Hannah Cuviello @ 8:06 pm

Lately, I have been spending a little more time than usual crocheting. In part, I was inspired by a particularly fun Crochet Class I had the honor of teaching a couple of weekends ago (8 new crocheters in the world; woohoo!). Also, I happened to have had a ridiculously cute crochet project on my list of 30.

You may be happy to know that the list is now 28. Boo-yah.

Note that I did not design this adorable creature; it is a Ravelry download by Dawn Toussaint.

I have, however, written up a very simple crocheted beanie pattern (I wouldn’t call it “Design”, but I did do the typing, anyway).

I recently discovered that all my husband ever wanted was a crocheted beanie.  The discovery process went like this:

Husband: I would like a hat, please.

Me: I would love to make you a hat!

Husband: Could it be just a plain hat with a plain edge?

Me: (makes stockinette hat with rolled edge)

Husband: I love my hat, but could it have a different kind of edge?

Me: (starts hat with ribbed edge)

Husband: Hmmm…no, just a plain edge. My friend has one I really like; I want one just like his.

*Meet with friend, discover that coveted hat is a crocheted beanie*

He is very happy with it.

Both the hat above and the unicorn are crocheted in spirals. Now, I am generally a discrete rounds kind of girl*, but I discovered through the process of crocheting this hat that spirals are really a wonderful way to show off handpainted yarns, like Lorna’s Laces Shepherd Worsted  (used for the hat above).

*When I refer to spirals vs discrete rounds, it has to do with the process of ending and beginning a round in crochet. When you crochet a spiral, you don’t do anything different at the end of the round; you just keep crocheting on top of the previous round. If you were to crochet stripes using the spiral method, you would get a jog at the end of the round when you switch from one color to another. When you crochet in discrete rounds (at least that’s what I call it), you begin the round with a chain to bring the yarn up to the height of the new round. When you get to the last stitch, you slip stitch in the first crochet of the round to close it off.

Anyway, as I was saying…

Both these patterns also start off with a Magic Ring.*

*Not the kind that makes you invisible.

The Magic Ring, (or “Magic Circle” or “Magic Loop”) is an adjustable ring. into which you make the sts of your first round. It takes the place of instructions like, “Ch5, slst in first chain to form ring”. Now, we just say, “Make Magic Ring”.

Here, in painstaking detail, is what that looks like:

You with me so far?

So here is the big secret: the “Magic Ring” is just a slip knot that you don’t tighten. Why didn’t we just say that in the first place?!

That said, let us continue. So you have this slip knot that you haven’t tightened…

From here, I imagine that most of you can figure your way to the beginning of your crochet project. Just for good measure, though, I will include the next few steps.

The number of single crochets you make in the ring will be determined by your pattern. The number will, however, very frequently be 6 (or 5 or 8). In the picture below, I have done 6 single crochets (the thing at the very end that looks like a 7th st is the chain I made in step 8).

   Since we’re on the subject, I might as well keep going (I’ll have a whole hat by the end of this post…not really).

If you choose to crochet in a spiral, it is quite helpful to keep track of where you round begins and ends. I do this with a piece of yarn.

Now you have all the skills you need to make a simple crocheted beanie.

This tutorial has been brought to you by the letter G:

and by the color “Franklin’s Panopticon”:

I hope you’ve had fun. With any luck, the next time you hear from me I will have only 27 unfinished projects.


29! February 26, 2012

Filed under: Uncategorized — Hannah Cuviello @ 1:06 pm

I have a little update on my sea of unfinished projects. I am officially down to 29! *applause!*

OK, almost officially. The Cthulhuclava is pretty much done and has, in fact been worn.

I wove in the last end just in time for a Fat Tuesday party at our favorite bar. Since it has made its appearance in public,  I think that counts. A small miscalculation in picking up stitches may have led to some holes in the cheeks, which I have promised to go back and close up with little gusset panels…but that doesn’t count. Really, it will take just moments to fix. moments.

In the meantime, I am a couple of freckles away from finishing the unicorn. : )

Since my last blog post, I have not cast on any new projects (because we determined that ripping out and recasting on one of the projects on the list does not count).

In addition, I have only purchased yarn for one new project (a sweater). Notice the clever phrasing I use to make that seem like an immense exercise in restraint (which it really was). For the record, the yarn was green and on big time sale, so it does not count. I just made that rule up.

I swear I will finish one of the six sweaters I have on the needles before I cast on my green sweater. Really.

My goal is to keep posting my project status as a way of encouraging myself to stick with it. I have learned better than to make any promises when it comes to blog posts, but I really have the best intentions. Next up on the finishing block (after the unicorn) is my Scout pullover. This is the one I could, ostensibly, finish with just one night of knitting and seaming. My goal is to have it done by next week. Lets see…


Nothing to be Ashamed Of February 20, 2012

Filed under: Uncategorized — Hannah Cuviello @ 7:44 pm

As promised in my last post, I have embarked on a stash spelunking, UFO unearthing, start-itis quelling (not really) expedition.  The goal of this endeavor was to take stock of my unfinished projects and shame me into encourage and re-inspire me to finish them. I have to say that I was indeed rather encouraged by my findings. Given my penchant for casting on and my “I’m cold, I’d better cast on a sweater” outlook on life*, I expected numbers in the triple digits.

*The general pattern of trying to meet immediate needs by embarking on long term projects, may pop up other places in my life, though certainly not to this extent.

The actual number was exactly 30. (Since I completed the count, I have finished one of the pictured projects…and unearthed another.)

Upon sharing this little fact about myself with people, I have received everything from incredulous smiles and appalled stares to understanding nods of the head, accompanied by an “I figured as much” or “Really, that’s all?!”  Several of my knitting friends (well, one or two) have agreed with me that 30 is a fairly reasonable number. I know plenty of people with easily twice that number of UFO’s. Granted, most of these people are also roughly twice my age, giving me what I assume to be a fairly accurate projection of my fate.

I did a little breakdown of the total. Would you like to see it?

We have 6 sweaters.

Only 4 of them are pictured here. They range from oldest to newest going left to right. First, a crocheted shrug; I have no idea where the pattern is. Second, a sweater that was actually knit and completed by a friend of my, but which did not actually fit either of us. I have since dismantled it and am reknitting the body and sleeves. Third, a Scout Pullover I began for myself. Note that the body is entirely done. When I was at this point on the original sample, I had it finished by the next day. I could, ostensibly, be wearing this sweater tomorrow. And yet…there is also number four, a simple top-down sweater I started last Fall when I was teaching a First Sweater Class (innocent enough). In my own defense, I do actually knit at least one row on this one every day (I keep it in my purse).

Not Pictured: a purple sweater which also has the body completed and a silk lace top from Knitting Lingerie Style, by Joan McGowan Michael, a master of sultry garment shaping.

I had hoped to have this one done for Valentine’s Day (two years ago), but I was busy counting my projects.

So. 6 sweaters, 4 socks.

Each of these socks has at least a couple of hours of knitting invested in them already.

4 shawls.

Two of these have since been torn out and re-cast on as a different kind of shawl, which, for the record, DOES NOT COUNT as casting on a new project. It is just repurposing a previous cast on.

2 scarves and 3 hats (2 pictured).

Three of these four items are intended for my beloved, long-suffering husband, which might make me feel a little guilty, were I not also knitting him this:

In case you couldn’t tell, it is a Cthulhuclava, designed by Anne-Marie Dunbar. I wouldn’t necessarily recommend it for new knitters, but if you are ever looking for an exercise in extremely clever shaping, this would be the pattern. It is actually next on my list of must-finish, which is turning out to require an immense amount of self control, seeing as I also have this project staring accusingly at me.

   In fact, quite literally staring. I know what you’re saying, “Hannah, how can you just leave it there? It has a face!”  Well, sometimes being a compulsive project starter requires me to harden my heart and just look away.

The oldest UFO I unearthed was a (not yet) Felted Clog.

Anyone who has ever knit the Fiber Trends Felt Clog pattern will look at this picture and know that this clog is just about an hour away from being done and ready to felt. Its mate is done and, in fact, felted, and has been for about 4 years (yes, I do know where it is; I found it while I was digging). I would sit right down and do it now, except that this project is even closer to being done.

It’s a linen stitch headband. All I need to do is finish the button loops and sew on the buttons. That’s it. Minutes. (Since this picture was taken, I have actually finished it; I have also unearthed another UFO, so the number is still 30).

The prize for the furthest-from-being-done goes to my Little Black Dress. It is currently, ahem, very little.

It is, in fact, about 8″x4″. I have hope, though.

   In addition, I have an unfinished baby blanket (one square done), baby sweater (ribbing and cable set up done), baby bootie (one completed, just needs seaming), a pre-felted bag and two mitts. The mitts are actually using the same pattern, but using 2 different yarns and with 2 different intended recipients. Oddly enough, I stopped working on them in precisely the same place.

    In the interest of full disclosure, I chose not to count pairs of socks, one of which is completely done and the second of which has not yet been started (I may be an optimist, but even I have my limits), and swatches that I have done for design ideas (that’s work, so it doesn’t count).

  Also, during the time it took to gather up, count and photograph all these projects, I may have begun and finished (finished, so it doesn’t count) another project.

    So there we go. If we were to separate the world of knitters into two types, those who knit because they want to eventually possess a specific thing (product knitters) and those who just knit (process knitters), I would apparently fall into the latter category. It’s not that I don’t want to have each one of these projects that I have started. It’s just that I don’t seem to want it very badly or for very long. I consider myself a fairly steadfast person, so it may be that I have concentrated all the fickleness in my character to this one pursuit. My husband, with whom I have happily spent the last 13 years of my life, is quite satisfied with this arrangement.

   When I brought up my UFOs with my parents, my mother (who does not share my compulsion at all and has a respectable 4 or 5 works in progress, none of which are more than a few months old, I’m sure) reminded me about Grammy. We’re pretty sure that Grammy’s compulsive yarn buying (I had never actually seen the walls of her guest bedroom because they were piled up with yarn) was her way of seeking immortality. How could she possibly ever die if she had so much yarn to knit?

   I don’t really think that having an unlimited supply of UFO’s will keep me alive forever, but it should, at least, keep me from ever being bored. If I ever feel boredom sneaking up on my, I can just pull up this post and be re-inspired. If I am ever having a day when I feel miserably unproductive, I can just pull out one of those oh-so-close projects and finish it up for a quick, easy feeling of accomplishment. See? It serves its purpose, and I am not at all ashamed.


In Case You Missed It… January 16, 2012

Filed under: how to,New pattern,Yarn Pics,Yarn review — Hannah Cuviello @ 8:17 pm

About a year ago, I think that I made some foolishly brash comment about blogging more frequently in 2011. I suppose that I should have known better. I have the best intentions…really I do.

I think that this year, I will make no such empty promises. Instead, I will start off the year (or the third week of it anyway) by posting some of the picture tutorials that made it into my newsletters (note that this is a link to where you can sign up to receive said newsletters).  Some of these may exist in a previous blog somewhere, so if there are repeats, I’m very sorry!

What follows is a modest collection of technique tutorials for knitting and crochet.

Crochet Puff Stitch

From the Summer Newsletter, this is a fun little stitch I used in the upper border for my Sun People Market Bag.

The finished product in context looks like this:

Shortly thereafter (several weeks actually, since I send out newsletters only slightly more frequently than I post to my blog), I put together a little how-to for Thrumming (totally fun and ever-so-cozy, if you haven’t tried it before).

Thrumming: The Basics

Step 1 is the preparation of the Thrum.

Step 2 is the inserting of the Thrum into the knitting.

I used this technique in my Thrummed Scraper Mitt, an item for which I have been extremely grateful in the past several weeks (no snow on the ground since October, but plenty of ice encasing my windshield).

Speaking of snow…

In December, I began to have temper tantrums about not having any snow on the ground and put together a little pattern in honor the the snow I did not have. This pattern used…

The Picot Cast On

This was the edging for my Snowflakes that Stay cowl.

Incidentally, I used a lace weight, sequined mohair blend for this cowl and I love it quite a lot. I’m not sure how to feel about that, since I normally avoid sequins if at all possible. It’s just so shiny. So sparkly…

Still on a cowl kick in the middle of December, I proceeded to post this cowl, again using a fun and interesting cast on.

i-Cord Cast On

And here it is in action.

The yarn I used here is Mirasol Sulka, which I love. We had just recently received several new colors, and this pattern was a little celebration in honor of them.  Also, I was very cold. In fact, I don’t know that I have taken that cowl off since then.*

*Actually, I have taken it off. Once or twice.

For the record, we still do not have snow on the ground, and they have been promising it all week. Even Portland has snow. Portland!

I feel like I must be missing some tutorials, so I will be digging around in my computer for more and will post them (some day), when I find them.

  For the immediate future, look forward to a shocking tell-all confessional regarding unfinished and recently started projects, the goal of which will be to shame me encourage me to finish some of them.


Ways of Knitting, Part 3: Why We Care May 20, 2011

Filed under: Uncategorized — Hannah Cuviello @ 9:33 pm

A long time ago A perfectly reasonably amount of time ago, I wrote some posts in which I went into obsessive detail perfectly reasonable and healthy detail about stitch mount, direction of wrapping, and all the lovely combinations we find in knitting. I had intended to write a couple of follow up posts talking about why we even care. I am now ready to do this. (finally.)

Let’s jump right into it.

You may remember that there are two ways your stitches can be sitting on the needle.

In the first picture, the stitches are sitting with the right leg (the leading leg, which is closest to the tip of the needle and the working yarn) in front. In the second picture, the leading leg is in back.

Now, remember that I am an emphatic promoter of the “no wrong way to knit” camp. I happen to knit so that my leading leg is in front. Many excellent knitters knit with their leading legs in back.

That said, it is important to know that there is a difference and to be aware that most patterns are written assuming that the leading leg is in front. By most patterns, I mean every pattern that I have ever seen (that is not to say that there may not be some out there that assume differently). Honestly, for maybe 80% of patterns*, it really doesn’t matter.

*I totally made that number up; my point is that it’s lots.

The difference is most pronounced when it comes to decreases. Here is why.

There are many different kinds of decreases, and these decreases look different from one another. Specifically, different decreases are said to “lean” in a particular direction. Frequently, patterns tell you to use one or the other with that in mind.

When a pattern tells you to “k2tog” (knit 2 together) they expect you to come up with this:

K2tog (knit 2 together); right leaning decrease

When a pattern tells you to ssk (slip, slip, knit 2 together through the back loops)*, they are looking for something like this:

ssk (slip, slip, knit): a left leaning decrease

Frequently, a pattern will have you do one kind of decrease on one side of the garment and the other on the other side, so that the decreases are symmetrical.The difference is especially important in lace knitting, where the choice of decrease affects the lines and figures in the lace.

In the rest of this post, I will go through these two basic decreases more or less step by step for stitches with the leading legs in front and stitches with leading legs in back, and we can see what adjustment must be made to achieve the same look.

Let’s start with the right leaning decrease, the K2tog.

When the leading leg is in front of the needle, the process looks like this:

K2tog process, with leading leg in front

Those people I know who knit through the back loop don’t hesitate when they see k2tog; they do what is natural and knit two together through the back loops:

K2togtbl (natural K2tog when the leading leg is in back).

This is called a K2togtbl, meaning “Knit 2 together through the back loops” (or the leg behind the needle). Notice that this makes a perfectly lovely left-leaning decrease. If an unsuspecting  Back Loop Knitter were to use this stitch when a pattern says “K2tog”, the result will be a little different from what the pattern (and the knitter) expected.

If a Back Loop Knitter were to k2tog through the front loops, the result would be a right leaning decrease, but it would be twisted at the base.

K2tog through the front loops, when leading leg is in back

This is the same thing that happens when a Front Loop Knitter does a K2togtbl.

So how do we get an untwisted, right leaning decrease when the leading leg is in back?

SSK (slip, slip, knit 2 slipped sts together) when leading leg is in back; right leaning decrease.

The process is actually the same as what Front Loop Knitters have to go through to get a left leaning decrease (which really makes sense when you think about it). Now, some of you might be saying, “Hey! You’re just changing the stitch orientation and knitting 2 together!” Yes. That is exactly what we are doing.

Let’s look at the Left leaning decrease for Front Loop Knitters.

SSK (Slip, slip, k2 slipped sts together through back loop) with leading leg in front; left leaning decrease.

Hey! You’re just changing the stitch orientation and knitting 2 together through the back loops.

Yes!

So there we have it. That’s why it’s important to know about your stitch orientation. (One wonders why it took me year and a half to get around to writing this blog post…).

To sum up…

Front Loop Knitters:

Right leaning decrease = k2tog

Left leaning decrease = ssk (slip, slip, knit 2 slipped sts together through back loops)

Back Loop Knitters:

Right leaning decrease = ssk

Left leaning decrease = k2tog(tbl)

This means, Back Loop Knitters, that when a patter says “k2tog”, you should ssk and when it says “ssk”, you should k2tog tbl.

The end.

Now go knit lace!

For the rest of the evening, I will be crocheting a dinosaur tape measure. Pictures to follow.