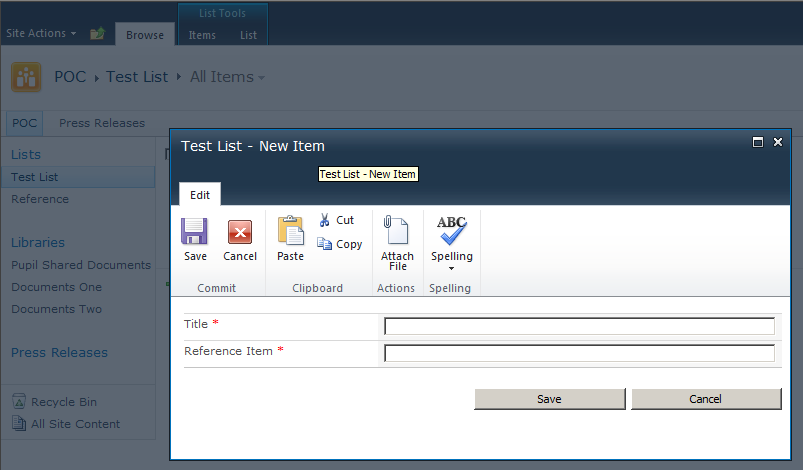
In this post, somewhat inspired by @BinaryJam‘s series on list form customisation using SharePoint designer, we will create a new (New Item) list form and update an existing Edit form programmatically, and add the SPServices autocomplete feature to both forms of an existing list.
The SPServices autocomplete will be attached to a list column which looks up against an existing list in the site, and this post assumes that jQuery and SPServices are already deployed to the farm.
The existing list used as the autocomplete target is a very simple list with a single Title column
The list in which we will create a new (New Item) form and update the existing Edit form again is a simple list with a Title column and a Reference column, the later being the one we will apply the autocomplete feature to
Start by creating a feature receiver, in this case is doesn’t matter if the feature is Site or Web scoped, the first piece of code creates a new New Item form in the root folder of the list, and creates a new ListFormWebPart configured as a NEW_FORM and adds it to the page;
var list = web.Lists.TryGetList("Test List");
var rootFolder = list.RootFolder;

var newFormUrl = string.Format("{0}/{1}/NewFormAlt.aspx", web.ServerRelativeUrl, rootFolder.Url);
var newForm = web.GetFile(newFormUrl);
if (newForm != null && newForm.Exists)
	newForm.Delete();	// delete & recreate our new form

/* create a new NewForm */
newForm = rootFolder.Files.Add(newFormUrl, SPTemplateFileType.FormPage);
var wpm = newForm.GetLimitedWebPartManager(PersonalizationScope.Shared);
/* add a listformwebpart instance, configure it for the list */
var webpart = new ListFormWebPart
		{
			ListId = list.ID,
			ListName = list.ID.ToString("B").ToUpper(),
			PageType = PAGETYPE.PAGE_NEWFORM,
			Title = list.Title,
			Description = list.Description,
			CatalogIconImageUrl = list.ImageUrl,
			TitleUrl = list.DefaultViewUrl,
			//TemplateName = "SomeCustomRenderingTemplate"
		};
wpm.AddWebPart(webpart, "Main", 0);
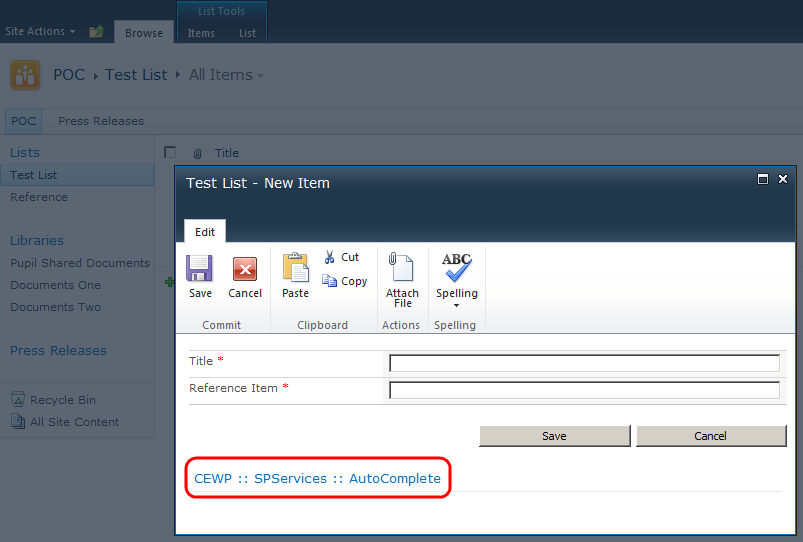
The next piece of code creates a Content Editor webpart instance with a script block to introduce the autocomplete feature, this webpart is then added to the new (New Item) form.
/* add the SPService autocomplete using a CEWP instance */
string err;
var cewp = wpm.ImportWebPart(new XmlTextReader(new StringReader(SpServicesCewp)), out err);
wpm.AddWebPart(cewp, "Main", 9);
The Content Editor webpart is defined as a static Xml string as shown, note that the webpart is configured with an ID value, which is used to identify the webpart in the form when we want to remove it, or make sure we don’t add it to the form twice;
<WebPart xmlns:xsi="<a href="http://www.w3.org/2001/XMLSchema-instance">http://www.w3.org/2001/XMLSchema-instance</a>" xmlns:xsd="<a href="http://www.w3.org/2001/XMLSchema">http://www.w3.org/2001/XMLSchema</a>" xmlns="<a href="http://schemas.microsoft.com/WebPart/v2">http://schemas.microsoft.com/WebPart/v2</a>">
  <Title>CEWP :: SPServices :: AutoComplete</Title>
  <FrameType>TitleBarOnly</FrameType>
  <Description>CEWP :: SPServices :: AutoComplete</Description>
  <IsIncluded>true</IsIncluded>
  <ZoneID>Main</ZoneID>
  <PartOrder>2</PartOrder>
  <ID>g_13e5d19f_d45b_41d9_9bd6_d1d001bcf59a</ID>
  <FrameState>Normal</FrameState>
  <Height />
  <Width />
  <AllowRemove>true</AllowRemove>
  <AllowZoneChange>true</AllowZoneChange>
  <AllowMinimize>true</AllowMinimize>
  <AllowConnect>true</AllowConnect>
  <AllowEdit>true</AllowEdit>
  <AllowHide>true</AllowHide>
  <IsVisible>true</IsVisible>
  <DetailLink />
  <HelpLink />
  <HelpMode>Modeless</HelpMode>
  <Dir>Default</Dir>
  <PartImageSmall />
  <MissingAssembly>Cannot import this Web Part.</MissingAssembly>
  <PartImageLarge>/_layouts/images/mscontl.gif</PartImageLarge>
  <IsIncludedFilter />
  <Assembly>Microsoft.SharePoint, Version=14.0.0.0, Culture=neutral, PublicKeyToken=71e9bce111e9429c</Assembly>
  <TypeName>Microsoft.SharePoint.WebPartPages.ContentEditorWebPart</TypeName>
  <ContentLink xmlns="<a href="http://schemas.microsoft.com/WebPart/v2/ContentEditor">http://schemas.microsoft.com/WebPart/v2/ContentEditor</a>" />
  <Content xmlns="<a href="http://schemas.microsoft.com/WebPart/v2/ContentEditor%22%3E%3Cscript">http://schemas.microsoft.com/WebPart/v2/ContentEditor"><![CDATA[<script</a> type="text/javascript" src="/_layouts/jquery/jquery-1.6.2.min.js"></script>
<script type="text/javascript" src="/_layouts/jquery/jquery.SPServices-0.7.0.min.js"></script>
<script type="text/javascript">
    $(document).ready(function() {
        $().SPServices.SPAutocomplete({
            sourceList: "Reference",
            sourceColumn: "Title",
            columnName: "Reference Item",
            numChars: 2,
            ignoreCase: true,
            slideDownSpeed: 100,
            debug: false
        });
    });
</script>]]></Content>
  <PartStorage xmlns="<a href="http://schemas.microsoft.com/WebPart/v2/ContentEditor">http://schemas.microsoft.com/WebPart/v2/ContentEditor</a>" />
</WebPart>
The next piece of code, updates the existing Edit form on the list and adds the SPServices autocomplete (Content Editor Webpart) to it
/* get the default edit form, and add the SPServices CEWP if needed */
var editFormUrl = string.Format("{0}", list.DefaultEditFormUrl);
var editForm = web.GetFile(editFormUrl);
if (editForm != null && editForm.Exists)
{
	wpm = editForm.GetLimitedWebPartManager(PersonalizationScope.Shared);
	cewp = wpm.WebParts.Cast<WebPart>()
					.FirstOrDefault(wp => wp.ID.Equals("g_13e5d19f_d45b_41d9_9bd6_d1d001bcf59a"));
	if (cewp == null)
	{
		cewp = wpm.ImportWebPart(new XmlTextReader(new StringReader(SpServicesCewp)), out err);
		wpm.AddWebPart(cewp, "Main", 9);
	}
}
And finally, the list is updated to set its default new Item form url
/* set the lists default NewForm url to the new form we created */
list.DefaultNewFormUrl = newFormUrl;
list.Update();
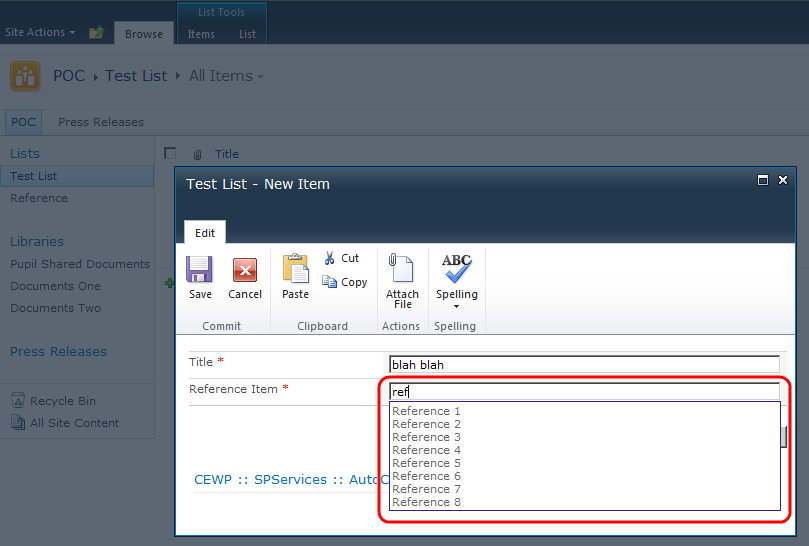
Build, deploy and activate the feature, creating a new list item now, shows the new form and the autocomplete feature working as required;
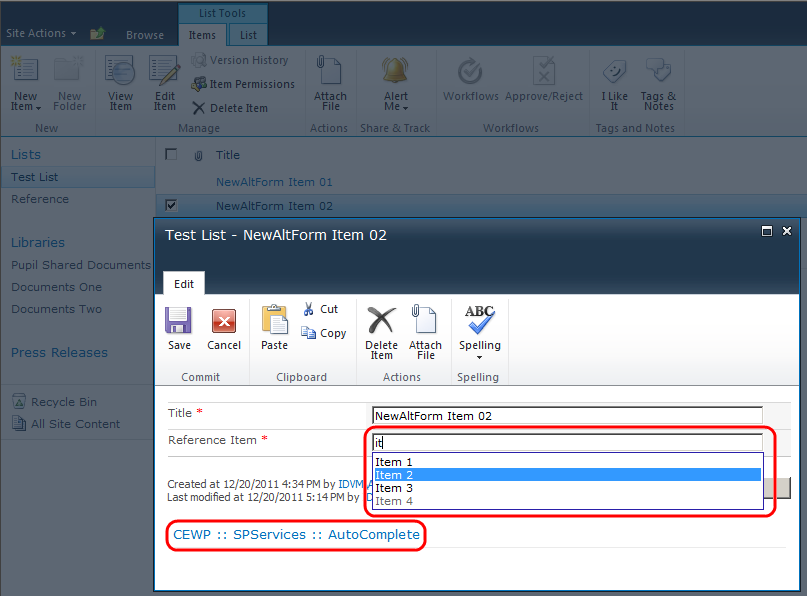
Editing a list item, now also shows that the autocomplete feature as been added to the form;
The complete code is as follows
var list = web.Lists.TryGetList("Test List");
var rootFolder = list.RootFolder;

var newFormUrl = string.Format("{0}/{1}/NewFormAlt.aspx", web.ServerRelativeUrl, rootFolder.Url);
var newForm = web.GetFile(newFormUrl);
if (newForm != null && newForm.Exists)
	newForm.Delete();	// delete & recreate our new form

/* create a new NewForm */
newForm = rootFolder.Files.Add(newFormUrl, SPTemplateFileType.FormPage);
var wpm = newForm.GetLimitedWebPartManager(PersonalizationScope.Shared);
/* add a listformwebpart instance, configure it for the list */
var webpart = new ListFormWebPart
	{
		ListId = list.ID,
		ListName = list.ID.ToString("B").ToUpper(),
		PageType = PAGETYPE.PAGE_NEWFORM,
		Title = list.Title,
		Description = list.Description,
		CatalogIconImageUrl = list.ImageUrl,
		TitleUrl = list.DefaultViewUrl,
		//TemplateName = "SomeCustomRenderingTemplate"
	};
wpm.AddWebPart(webpart, "Main", 0);

/* add the SPService autocomplete using a CEWP instance */
string err;
var cewp = wpm.ImportWebPart(new XmlTextReader(new StringReader(SpServicesCewp)), out err);
wpm.AddWebPart(cewp, "Main", 9);

/* get the default edit form, and add the SPServices CEWP if needed */
var editFormUrl = string.Format("{0}", list.DefaultEditFormUrl);
var editForm = web.GetFile(editFormUrl);
if (editForm != null && editForm.Exists)
{
	wpm = editForm.GetLimitedWebPartManager(PersonalizationScope.Shared);
	cewp = wpm.WebParts.Cast<WebPart>()
					.FirstOrDefault(wp => wp.ID.Equals("g_13e5d19f_d45b_41d9_9bd6_d1d001bcf59a"));
	if (cewp == null)
	{
		cewp = wpm.ImportWebPart(new XmlTextReader(new StringReader(SpServicesCewp)), out err);
		wpm.AddWebPart(cewp, "Main", 9);
	}
}

/* set the lists default NewForm url to the new form we created */
list.DefaultNewFormUrl = newFormUrl;
list.Update();
Reverting the changes is also a simple procedure
/* remove new list form */
var testList = web.Lists.TryGetList("Test List");
var rootFolder = testList.RootFolder;

var formUrl = string.Format("{0}/{1}/NewFormAlt.aspx", web.ServerRelativeUrl, rootFolder.Url);
var form = web.GetFile(formUrl);
if (form != null && form.Exists)
	form.Delete();	// delete new form

/* restore original new form */
formUrl = string.Format("{0}/{1}/NewForm.aspx", web.ServerRelativeUrl, rootFolder.Url);
form = web.GetFile(formUrl);
if (form != null && form.Exists)
{
	testList.DefaultNewFormUrl = formUrl;
	testList.Update();
}

/* remove the SPServices CEWP from the original edit form */
formUrl = string.Format("{0}", testList.DefaultEditFormUrl);
var editForm = web.GetFile(formUrl);
if (editForm != null && editForm.Exists)
{
	var wpm = editForm.GetLimitedWebPartManager(PersonalizationScope.Shared);
	var cewp = wpm.WebParts.Cast<WebPart>()
					.FirstOrDefault(wp => wp.ID.Equals("g_13e5d19f_d45b_41d9_9bd6_d1d001bcf59a"));
	if (cewp != null)
		wpm.DeleteWebPart(cewp);
}
For more interesting results you might provide a custom rendering template or replace the ListFormWebPart with a DataViewWebPart coupled with some snazzy XSL, or even something completely custom, the possibilities, as they say, are endless.


Great Job..Phip 🙂
Great post I will be trying it out myself! Instead I’m going to have it use a custom web part i have for creating the list item.
I go through you article, its very nice.
My requirement is like this,
I want to do some changes in “Save” button logic. like I want to send email etc.
Have you thought about using a List Event Receiver or a Workflow attached to the list?
Great article!
I want to create a code for publish an InfoPath form in form library on sharepoint site so please help me for this that i found the method for upload but i want a code for publish.
Thanks
Phil, thanks for you post, it’s really usefull for me! Pay attention, there is one error in your code, you have missed paremeter in Cast() method. The correct cast here is Cast<WebPart>()
Thanks, updated the post.
How can I do this with Client Object Model?
Thank you Phil Harding!!! That was pure enlightenment!!