
 I will never forget the first time I cautiously glided around on my backyard rink. My son had skated early on Christmas morning as I shuffled around in my boots, still unsure of the ice thickness and not wanting to break through. But it had been cold enough the day after Christmas for me to give it a shot. I walked out to the rink and sat in a chair, pulled my warm boots off and laced up my cold skates. I tied the stiff laces, took a look at my wife standing in the doorway, stood up, and pushed off. The ice held. The trees creaked, the moon shone down. I laughed. I had my own rink.
“You’re nuts,” they had said. “You know you have to shovel it, right? And water it down, and build it each fall. And then if you get a hole…”
I knew. But I didn’t care. I really had no idea what I was getting into that first fall and winter, but I knew it would be great. And it was.
What I want to share with you below is a rough approximation of my first backyard rink, the rink that gave life to my son’s love for hockey, my family’s connection to the game, hundreds of memories, and this website. There is absolutely nothing in this world that compares to having your own backyard rink. I want you all to experience what I have experienced.
My goals for your first backyard rink are twofold: I want it to be simple and I want it to be inexpensive. We’ve talked here before about the high startup costs of hockey. The same can be true for outdoor rinks, but it doesn’t have to be. What I’m aiming to do here is to keep the initial costs low to allow you to experience the primal joy of owning your own rink. Once you’re hooked, you’ll find that spending more money expanding or improving it is money well spent.
 This rink design is for a 24’x40′ rink. The boards will be OSB with wooden stake supports, and they will be ~1′ high all around.
Disclaimer: As with all things backyard, this is not the only way to do this. It’s just how I did it. I used my setup for two years before I moved to a new house and a new design, but I’m confident that it would have lasted longer.
STOP! Have you read our instructions on how to determine if your yard is flat and level? If not, go read this post RIGHT NOW. Don’t come back until you know that your water level will be under 12″ at all four corners. If it ends up being more, adjust the instructions below accordingly (ie, bracing every 2′ and taller boards).
Materials
Though the specific materials can change, most backyard rinks share the same basic material list. You really need four things: a liner, a frame to drop the liner into, supports to keep the frame up, and water. Whether you spend $250 or $2,500, this list does not fundamentally change.
| Boards: For your boards, you’re going to use 7/16″ OSB sheathing. This is the stuff that the big-box hardware stores usually have near the front of the store. It’s cheap, it’s sturdy enough, and best of all, the major box stores will cut it for you. You will need 4 sheets of 4’x8′ OSB, ripped into 1′-wide vertical strips. This provides you with 128 linear feet of board material, perfect for a 24’x40′ rink. (Note: while the Lowes employee was cutting my boards, I checked out the scrap wood pile. I ended up buying several 2′-high pieces of OSB just in case. Not a bad idea if your yard isn’t perfectly level, and always good to have some extras on hand.) | 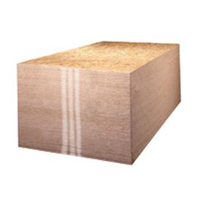 |
| Supports: Containing thousands of gallons of water puts a lot of stress on the boards. To keep your rink square (and to keep the water from blowing out the boards), you need strong supports. Some folks use rebar for this, but I’ve had good luck using 2″ x 2″ x 24″ wooden stakes. Home Depot stocks them, but I haven’t had much luck at my local Lowes. They generally come in bundles of six in the lumber or landscaping department. And, as a last resort, even Amazon stocks them. | 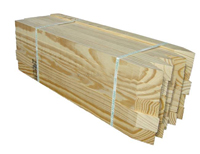 |
| Liner: For your liner, you want something strong and durable. But because we’re trying to keep costs down, you want something at the right price. We’ve teamed up with our sister company, Elite Backyard Rinks, to offer you a deal on a liner perfectly sized for a 24’x40′ rink. The liner is 32’x45′, and made of white 6 mil plastic. To purchase this liner, CLICK HERE. | 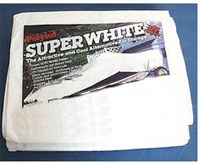 |
| Water: Obviously, it’s best if you can fill using your town’s water supply. You may notice a blip in your water bill if you’re metered, but it’s only a slight increase, and if you were sane and money conscious, you wouldn’t be into hockey and backyard rinks to begin with. If you must bring someone else in to fill (as I have to), look in the Yellow Pages for pool water. I use a pool water company (for anyone in Southern NH, it’s Fortin out of Londonderry), and the driver says he fills a couple dozen rinks every winter. The cost for this runs me an extra $200 or so. | 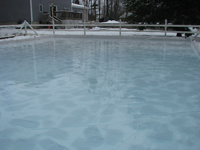 |
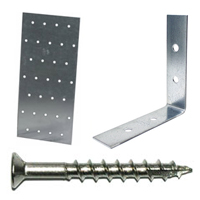
| Extras: There are a few items you’ll need to finish your install, but the cost is trivial and the pieces can be purchased anywhere. The first is a series of small metal mending plates (see image), which I used to connect the boards to each other. You don’t have to use these, but I found it helps. Second, you’ll need at least four L-shaped corner brackets to connect the boards. I used eight (two at each corner), and where the cost is relatively immaterial, I would recommend it. Lastly, you’ll need screws to hold it all together. I suggest the stainless variety, or the type you use to build a deck. Make sure they’re not so long that they’re going to go through your boards and puncture your liner.
Click here to see the exterior screw options on Amazon.com Click here to purchase the board mending plates on Amazon.com |
 |
| Total Cost:
Boards: 4 pieces of 7/16″ OSB sheathing at $7 each, or $28 Total Cost: $249 |
Frame Construction
Construction is much easier if you have a helper. Plan on some extra time if you provide beer or if your helper is one of your non-adult children.
1. Â Start out by staking out your four corners, ensuring that the rink area is square. To do this, simply take four stakes, measure out your length and width, and pound them into the ground. Then you need to check to ensure it’s square. To do this, measure diagonally across the rink from one corner to the other. Jot down that length. Then switch corners and measure the other diagonal. Once your two diagonals match, your rink is square. (Tip: for a 24×40 rink, your diagonal should be ~46.6 feet).
Once your rink stakes are square, run some string between each stake. When we build customer rinks, we then take some landscape spray paint and paint a line over the string. We then remove the string and stakes, and the spray paint provides you with a perfectly straight guide when installing your boards.
2. Â Lay out the 1′ boards you had cut around the inside of your rink. Start in one corner, having a helper hold up two corner boards while you connect the boards using an L-bracket. From there, connect your boards to each other using the connecting plates, making sure to keep the boards in line with the string/paint you ran in Step 1. While you are connecting the boards, your helper can pound the ground stakes into the ground on the outside of the boards you have already connected. Start with 4′ spacing between ground stakes. (Tip: Pound the stake 1′ into the ground, which leaves the top of the stake level with the top of your boards. Then drive a screw through the inside of the board into the stake.)
3.  Continue until you have your entire frame built. Walk around and give the boards a little kick; add additional bracing where necessary. There is no such thing as too much frame support. If it moves, support it.
Liner Installation and Fill Day
Once your frame is built, watch the weather. Weather.com’s 10-day forecast will become your new favorite site, as you look for 3-5 days of sub-freezing temperatures.
To install your liner, lug the box out to the center of your rink. Carefully cut it open and begin unrolling the liner. It may take a bit for you to recognize which sides are your long sides, but just keep unrolling until it becomes clear. If you need to rotate it, an assistant makes it easier.
When your liner is completely unrolled, center it between your end boards and your side boards. Walk the perimeter of your rink and make sure the liner goes all the way to the bottom of the boards before you bring it up and over the edges. It’s not a good idea to staple the liner to the boards before filling, as you may need to provide more slack. I’ve used spring clamps to hold the liner to the top of my boards, and Nicerink’s yellow bumper caps serve the same function while improving aesthetics and safety.
If you can help it, wait to lay your liner down until just before you’re going to fill it with water. I have to have my water trucked in, and last year I had to lay my liner the night before. To help keep the liner from ending up in my neighbor’s yard, I ran my garden hose for an hour or two, filling with just enough water to keep the liner on the ground.
As you fill, keep an eye on the boards, bracing, and liner. If your boards are bowing out, pound in a ground stake. If the ground is frozen, use rebar. If the water level is approaching the top of your boards, you can slip in a piece of the extra 2′ OSB between the liner and the 1′ board, then make a note to increase the height at that end the next year. If the liner is pulling away from the boards toward the center of the rink, unclip the spring clamps and provide more slack. You want your liner to press right up against the boards and the ground around the whole perimeter, as this will reduce the likelihood that the liner will tear.
Conclusion
Assuming your fill day went well, all that’s left to do is sit and wait. Â If you haven’t already, join the Backyard-Hockey.com Forums. Any questions you have will be answered by the brilliant minds that make up the group, and you can find ideas, suggestions, solutions, and a dash of humor in the archives.
It’s also a good time to read up on some of our other backyard rink articles, such as these:
–How To Drain, Dismantle, and Store Your Backyard Rink
–How to build a Homeboni (aka Rink Rake, Home Zamboni)
–How To Make A PVC Skating Aid
–How to Build an Official US Pond Hockey Championships Goal
Finally, now that you’re a part of our exclusive family, check out our Backyard Rinkbuilder’s Commandments. We wrote it for fun, but we also wrote it because it helps define the unwritten rules we all live by.
—
Owning a rink is hard work. I’ve tried to make these instructions as easy as possible, but don’t let that fool you into thinking any of this is simple. But as hard as it can be to get bundled up in the dead of winter to go shovel nearly a thousand square feet of snow by yourself, the return on your investment is unlike anything else.
Stop thinking about building a rink. Build a rink. And let us know how it goes.
COMMENTS HAVE BEEN DISABLED FOR THIS POST AS OF DECEMBER 12, 2011. HAVE A QUESTION OR COMMENT? HEAD OVER TO THE BACKYARD-HOCKEY.COM FORUMS, REGISTER, AND POST YOUR COMMENTS THERE. THIS WAY OTHERS WHO HAVE SIMILAR QUESTIONS WILL EASILY BE ABLE TO FIND YOUR TOPIC, AND YOU’LL HAVE A BETTER CHANCE OF HAVING YOUR QUESTION ANSWERED.

Love this article
Thank you for this informative write-up, it took the guess work out of everything! After making some adjustments to the plans, making the area 56’x24′. Finding a left over roll of greenhouse plastic for free on craigslist, and searching the workshop for anything that might be of use. My total came in just shy of $60 to build my backyard rink. Now its on to the rink rake, and waiting for mother nature to do her thing.
That’s awesome, congrats on your first build Dave! Send in some pictures when you’re all filled. Not sure if you’ve seen, but I have step-by-step instructions for the rink rake as well. On the menu at the top of the page, select “How-To” and it’s your second option. Thanks for reading and good luck with your season!
My first build…what is the depth of the water you put in for your initial fill? I was thinking three inches with an additional three inch top coat after the first one froze to give a six inch base to start skating on. What has worked well for you?
Hi Karen. Generally speaking, it’s best to fill all at once as opposed to two separate ‘layers’. Six inches is a good thickness to shoot for, with four inches being the bare minimum. Good luck!
Thanks so much for the quick reply! I also really liked your post for making an ice thickness ruler to install in each corner as well. You’re site has been a great resource.
Thank you for the kind words Karen. That means a lot. Best of luck in your first season! Send pictures once you’re out and skating!
Built our first rink and filled about 3 days ago now. We didn’t realize how sloped our backyard is in one corner, so we ended up with 9 1/2″ deep in one corner and 2 1/2″ in the diagonal corner. So far we only have about 1″ frozen on top. It seems like it’s never going to freeze!! Am I just being impatient? Or has anyone else experienced a similar situation? Can I re-surface already with only 1″ surface or is it too early? Any suggestions?
I also have tried building my first backyard rink for my son this year and also (as Meg stated above) underestimated the slope of our yard. Luckily, all but one corner of the rink filled nicely, but I am left putting water into this hard to fill corner every night, just hoping that the weather won’t get above freezing. After much deliberation and deer that came in to drink the water and put a hole in my liner in this corner, I made the decision that we would just cut the corner off. I did this by taking out the PVC that I used for the rink border in that corner and laying it diagonal to cut the corner off. It has seemed to work well, although now the rink isn’t a rectangle anymore, but my son doesn’t seem to care much.
My question now is this….should I just put the hose out there to fill and let it run until that corner is 5-6 inches deep and a layer of water covers the top of the rest?
The rest of the rink froze well(its now almost 6 inches of thick ice), but after 3 big snowstorms in a week and shoveling over 1 1/2 feet of snow off the ice, it seems the ice isn’t very smooth anymore. Friends have suggested putting a 1/2 inch layer of hot water on it and allowing it to freeze, but I am not quite sure how to proceed.
We are building a “homeboni” next week for use on the rink.
Any suggestions on how to make the final surface of the ice smooth enough for them to use for hockey?
Thanks for the great informative site…its awesome!!
Anyone ever tried doing a backyard rink when the ground is already frozen with a foot of snow on it? Or am I asking for a disaster?
Due to a warm up, I ended up having to start from scratch. Ended up getting rid of the PVC and framing the rink out with the materials you described above. Still had some pretty thick ice in the center of the rink but nothing around the edges or boards. problem is, once we framed it out and attached the liner to the boards and started to fill, I now have a leak somewhere under the thick ice. I get about 1 inch if fragile ice after a fill and it is hollow underneath. Is there anything I can do other than breaking all that thick ice to look for a tear in the liner? The weather is supposed to be in the 20’s or teens for the next 10 days so once everything freezes, will the leak stop?
Anything you can suggest would be a great help.
Well I ended up with the same situation as Karen. The peace and quiet of living in the woods is nice, but the wildlife destroyed my liner, on two seperate occasions. After losing all my water covering the entire surface, I’ve chosen a plan similar to the one Kirk mentioned. We got hammered with 23″ of snow yesterday so I pulled out a couple sheets of plywood and used them to pack the snow down so it was hard packed and semi even. I’ve been spraying light coats of water on a few times each night for the past two nights. As of now I have a nice hard coat of ice/snowish stuff on top, seems to be promising with some patience. I will not give up, even if I get to skate on it for a week it will be worth it. On the plus side I live around alot of water so me and my friends have been taking it to the ponds every saturday and sunday.
THANK YOU!!!!!!! I’ve always wanted to do this and never had a clue where to start. My son is too young this year, but I’ve always planned on building a rink, and now I know that next year I will. Thx. – Paul – Minnesota.
That’s great Paul. Good luck!
I buily my first rink with these plans more or less and flooded 2 night in a row and also found my yard is not level. I had a 2foot by 2 foot area that took 9 inches of water before the opposite end got even 2 inches. I had to add a 2 foot piece of wood around the deep corner to stop it from overflowing. it has been 3 days and it has been below freezing here (-15C) each night but that corner is slushy still and a few other spots make cracking noises. You can see through the nice it is like glass. Am I too impatient? Can I add another inch of water tonight as it is going down to -17C!!!
I’m looking for any suggestions on how to get rid of shell ice. This is my first backyard rink and started it late and got to far ahead of my self before really doing any research. I have already learned alot from this site and it has me already planning big & better for next season but as for I’m learning as i go please any advice? Thanks
Shell ice is no fun. Best way to remove it is to crunch it down with your boots (or skates), then fill it. Warm water is preferable, but cold water works if you need it to. Best bet is to use many thin layers as opposed to one thick one.
I’m heading into my second backyard rink. My first one was 15 x 25 and ended up working out great. My wife encouraged “us” to do a bigger rink this winter (and yes, by “us”, she really meant me).
On the topic of unlevel ground: is there a way to mitigate this? I thought about hiring a lawn rolling service right after what I determine is my last mow of the fall. Or getting some plywood to lay down under the sheet/tarp to even it out, but I wasn’t sure how much warping I’d get once the water was on it.
Any thoughts?
Thanks for a great, informative site!
Nick
Rochester, NY
I’m heading into my fourth year of rink building, wanting to expand to a low area of the yard to go from 24×40 to 30×50. I have a friend who has successfully used wooden pallets to level a low spot,I’m going to give it a try, putting the tarp right on top of the pallets laid flat in the low area.
I’ve found slush to be the best material to patch with after removing shell ice, mix up a garbage pail full and smear it on where needed. Let it freeze and then flood, much better than trying to patch with water.
Going to build a rink rake too, thanks for the plans.
Good luck to all, here’s to a cold winter.
“Lay out the 2′ boards you had cut around the inside of your rink.” Where do the 2′ Boards come from? Are these the boards from the scrap pile?
There is nothing wrong with flooding the rink in layers. ( I do three but have done two) If you flood to fast and the weather warms up you can have shelf ice or a floating iceberg. People often get really excited about wanting to fill and do it too soon. The three days of sub temps. is not to be taken lightly. You need to understand your enviorment (where you live) sometimes the temp drops quick and the ground is not even frozen. You can fill a base layer but make sure you have consistant sub temps when you add. Like others have suggested check out the Yahoo group Backyard rink. You can sometimes find people in your area. They have the best knowlege and you will find them posting when there is a winter warm up. Just remember its going to be different every year.. but working through it makes it worth it. And also remember if it was easy everybody would be doing it. Good luck.
I am planning on building this design in my backyard this winter and was wondering how much side wall is left after flooding your rink. Also what would you suggest if i wanted to build the walls higher behind the nets?
Ben – The amount of sidewall left depends on your slope and how high your water will be on any given side. On my original rink using these plans, I had about 1″ of boards showing in my deep end (which I fortified by slipping some 2′ tall boards between the liner and the 1′ boards) and about 8″ in my shallow end. Every yard will be different.
If you had a perfectly flat piece of land (which does not exist…I put my rink on a tennis court now and even it has slope), and you wanted to have 4″ of ice, that would give you 8″ of boards showing. But this never happens.
I have a post on building taller boards coming in the near future.
Chris – I disagree with the notion of flooding in layers, and here’s why: warm temps during your fill should not happen IF YOU PLAN ACCORDINGLY.
There is actually a thread on the Yahoo group right now about filling all at once vs in layers. Assuming you’re using a liner, there are absolutely ZERO negatives involved in filling at once. All the people I consider experts, and all the people who have tought me, agree.
That said, I completely agree about not filling too soon. I wait until December and watch for 5-7 days of below 20F temps at night and below freezing during the day. It’s never failed me.
Joe,
What size screws did you use with the 7/16″ OSB and did you mount the metal plates on the inside or outside? I checked the forums and there was not an answer.
Need some help
I am make a 50×100 rink in my back with a one piece tarp. The grounds not perfectly flat but pretty good made a bit of a mistake leveling the one corner is still too low and 1/4 of the rink is full or water and almost frozen, collected from rain. Do I need to take my rink apart and get a perfect level or can I wait till the corner is frozen and then continue filling a little at a time? Will the water still go to that corner and over the top? Or once it is full and frozen will it is continue to freeze back??
Hey everyone: we’ve decided to close the comments on this post, and ask that you direct any of your questions to the Backyard-Hockey.com Forums. This way others can view your question and the answer you receive.
Pingback: Oh yes, it’s ODR Season | The Pink Puck Oh yes, it’s ODR Season | Even if you wear pink, you can still rock the rink!