We offer private, customized training for 3 or more people at your site or online.
Downloads Required:
In this tutorial:
Files needed:
- ISProject1.zip
- ISProject2.zip
Related tutorials:
Microsoft says that SQL Server Integration Services (SSIS) “is a platform for building high performance data integration solutions, including extraction, transformation, and load (ETL) packages for data warehousing.” A simpler way to think of SSIS is that it's the solution for automating data movements. SSIS provides a way to build packages made up of tasks that can move data around from place to place and alter it on the way. There are visual designers (hosted within Business Intelligence Development Studio) to help you build these packages as well as an API for programming SSIS objects from other applications.
In this chapter, you'll see how to build and use SSIS packages. First, though, we'll look at a simpler facet of SSIS: The SQL Server Import and Export Wizard.
If you choose to use the supplied solution files rather than building your own, you may need to edit the properties of the OLE DB Connection Managers within the projects to point to your own test server. You'll learn more about Connection Managers in the “Working with Connection Managers” section later in this chapter. |
SSIS 2008 Tutorial: The Import and Export Wizard
Though SSIS is almost infinitely customizable, Microsoft has produced a simple wizard to handle some of the most common ETL tasks: importing data to or exporting data from a SQL Server database. The Import and Export Wizard protects you from the complexity of SSIS while allowing you to move data between any of these data sources:
- SQL Server databases
- Flat files
- Microsoft Access databases
- Microsoft Excel worksheets
- Other OLE DB providers
You can launch the Import and Export wizard from the Tasks entry on the shortcut menu of any database in the Object Explorer window of SQL Server Management Studio.
Try It!
To import some data using the Import and Export Wizard, follow these steps:
- Launch SQL Server Management Studio and log in to your test server.
- Open a new query window.
- Select the master database from the Available Databases combo box on the toolbar.
- Enter this text into the query window: CREATE DATABASE Chapter16
- Click the Execute toolbar button to create a new database.
- Expand the Databases node in Object Explorer
- Right-click on the Chapter16 database and select Tasks > Import Data.
- Read the first page of the Import and Export Wizard and click Next.
- Select SQL Native Client for the data source and provide login information for your test server.
- Select the AdventureWorks2008 database as the source of the data to import.
- Click Next.
- Because you're importing data, the next page of the wizard will default to connection information for the Chapter16 database. Click Next.
- Select Copy Data From One or More Tables or Views and click Next. Note that if you only want to import part of a table you can use a query as the data source instead.
- Select the HumanResources.Department, HumanResources.JobCandidate and HumanResources.Shift tables, as show in Figure 16-1. As you select tables, the wizard will automatically assign names for the target tables.
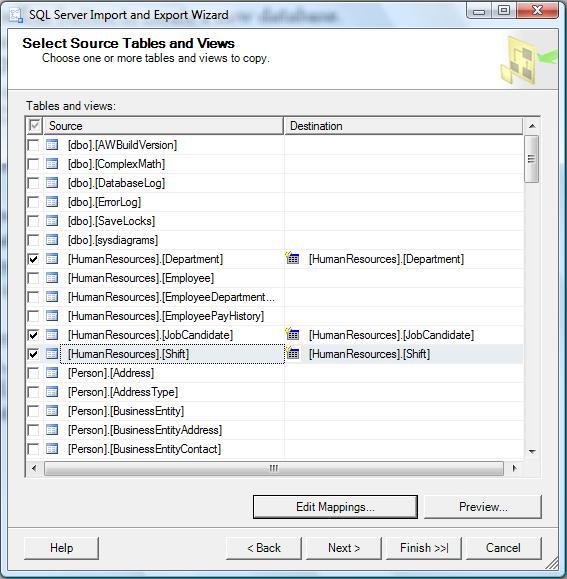
Figure 16-1: Selecting tables to import
- Select the HumanResources.Shift table and click on the Edit Mappings button.
- The Column Mappings dialog box lets you change the name, data type, and other properties of the destination table columns. You can also set other options here, such as whether to overwrite or append data when importing data to an existing table. Click Cancel when you're done inspecting the options.
- Click Next.
- Check Execute Immediately and click Next.
- Click Finish to perform the import. SQL Server will display progress as it performs the import, as shown in Figure 16-2.
Figure 16-2: Import Wizard results
- Click Close to dismiss the report.
- Expand the Tables node of the Chapter16 database to verify that the import succeeded.
In addition to executing its operations immediately, the Import and Export Wizard can also save a package for later execution. You'll learn more about packages in the remainder of this chapter. |
SSIS 2008 Tutorial: Creating a Package
The Import and Export Wizard is easy to use, but it only taps a small part of the functionality of SSIS. To really appreciate the full power of SSIS, you'll need to use BIDS to build an SSIS package. A package is a collection of SSIS objects including:
- Connections to data sources.
- Data flows, which include the sources and destinations that extract and load data, the transformations that modify and extend data, and the paths that link sources, transformations, and destinations.
- Control flows, which include tasks and containers that execute when the package runs. You can organize tasks in sequences and in loops.
- Event handlers, which are workflows that runs in response to the events raised by a package, task, or container.
You'll see how to build each of these components of a package in later sections of the chapter, but first, let's fire up BIDS and create a new SSIS package.
Try It!
To create a new SSIS package, follow these steps:
- Launch Business Intelligence Development Studio.
- Select File > New > Project.
- Select the Business Intelligence Projects project type.
- Select the Integration Services Project template.
- Select a convenient location.
- Name the new project ISProject1 and click OK.
Figure 16-3 shows the new, empty package.
Figure 16-3: Empty SSIS package
SSIS 2008 Tutorial: Working with Connection Managers
SSIS uses connection managers to integrate different data sources into packages. SSIS includes a wide variety of different connection managers that allow you to move data around from place to place. Table 16-1 lists the available connection managers.
Connection Manager |
Handles |
ADO |
Connecting to ADO objects such as a Recordset. |
ADO.NET |
Connecting to data sources through an ADO.NET provider. |
CACHE |
Connects to a cache either in memory or in a file |
MSOLAP100 |
Connecting to an Analysis Services database or cube. |
EXCEL |
Connecting to an Excel worksheet. |
FILE |
Connecting to a file or folder. |
FLATFILE |
Connecting to delimited or fixed width flat files. |
FTP |
Connecting to an FTP data source. |
HTTP |
Connecting to an HTTP data source. |
MSMQ |
Connecting to a Microsoft Message Queue. |
MULTIFILE |
Connecting to a set of files, such as all text files on a particular hard drive. |
MULTIFLATFILE |
Connecting to a set of flat files. |
ODBC |
Connecting to an ODBC data source. |
OLEDB |
Connecting to an OLE DB data source. |
SMOSever |
Connecting to a server via SMO. |
SMTP |
Connecting to a Simple Mail Transfer Protocol server. |
SQLMobile |
Connecting to a SQL Server Mobile database. |
WMI |
Connecting to Windows Management Instrumentation data. |
Table 16-1: Available Connection Managers
To create a Connection Manager, you right-click anywhere in the Connection Managers area of a package in BIDS and choose the appropriate shortcut from the shortcut menu. Each Connection Manager has its own custom configuration dialog box with specific options that you need to fill out.
Try It!
To add some connection managers to your package, follow these steps:
- Right-click in the Connection Managers area of your new package and select New OLE DB Connection.
- Note that the configuration dialog box will show the data connections that you created in Chapter 15; data connections are shared across Analysis Services and Integration Services projects. Click New to create a new data connection.
- In the Connection Manager dialog box, select the SQL Native Client provider.
- Select your test server and provide login information.
- Select the Chapter16 database.
- Click OK.
- In the Configure OLE DB Connection Manager dialog box, click OK.
- Right-click in the Connection Managers area of your new package and select New Flat File Connection.
- Enter DepartmentList as the Connection Manager Name.
- Enter C:\Departments.txt as the File Name.
- Check the Column Names in the First Data Row checkbox. Figure 16-4 shows the completed General page of the dialog box.
Figure 16-4: Defining a Flat File Connection Manager
- Click the Advanced icon to move to the Advanced page of the dialog box
- Click the New button.
- Change the Name of the new column to DepartmentName.
- Click OK.
- Right-click the DepartmentList Connection Manager and select Copy.
- Right-click in the Connection Managers area and select Paste.
- Click on the new DepartmentList 1 connection to select it.
- Use the Properties Window to change properties of the new connection. Change the Name property to DepartmentListBackup. Change the ConnectionString property to C:\DepartmentsBackup.txt.
Figure 16-5 shows the SSIS package with the three Connection Managers defined.
Figure 16-5: An SSIS package with two Connection Managers
SSIS 2008 Tutorial: Building Control Flows
The Control Flow tab of the Package Designer is where you tell SSIS what the package will do. You create your control flow by dragging and dropping items from the toolbox to the surface, and then dragging and dropping connections between the objects. The objects you can drop here break up into four different groups:
- Tasks are things that SSIS can do, such as execute SQL statements or transfer objects from one SQL Server to another. Table 16-2 lists the available tasks.
- Maintenance Plan tasks are a special group of tasks that handle jobs such as checking database integrity and rebuilding indexes. Table 16-3 lists the maintenance plan tasks.
- The Data Flow Task is a general purpose task for ETL (extract, transform, and load) operations on data. There's a separate design tab for building the details of a Data Flow Task.
- Containers are objects that can hold a group of tasks. Table 16-4 lists the available containers.
Task |
Purpose |
ActiveX Script |
Execute an ActiveX Script |
Analysis Services Execute DDL |
Execute DDL query statements against an Analysis Services server |
Analysis Services Processing |
Process an Analysis Services cube |
Bulk Insert |
Insert data from a file into a database |
Data Mining Query |
Execute a data mining query |
Data Profiling Task |
Generate a profile of sample data, determining distribution of values or percentage of NULLs, etc. |
Execute DTS 2000 Package |
Execute a Data Transformation Services Package (DTS was the SQL Server 2000 version of SSIS) |
Execute Package |
Execute an SSIS package |
Execute Process |
Shell out to a Windows application |
Execute SQL |
Run a SQL query |
File System |
Perform file system operations such as copy or delete |
FTP |
Perform FTP operations |
Message Queue |
Send or receive messages via MSMQ |
Script |
Execute a custom task |
Send Mail |
Send e-mail |
Transfer Database |
Transfer an entire database between two SQL Servers |
Transfer Error Messages |
Transfer custom error messages between two SQL Servers |
Transfer Jobs |
Transfer jobs between two SQL Servers |
Transfer Logins |
Transfer logins between two SQL Servers |
Transfer Master Stored Procedures |
Transfer stored procedures from the master database on one SQL Server to the master database on another SQL Server |
Transfer SQL Server Objects |
Transfer objects between two SQL Servers |
Web Service |
Execute a SOAP Web method |
WMI Data Reader |
Read data via WMI |
WMI Event Watcher |
Wait for a WMI event |
XML |
Perform operations on XML data |
Table 16-2: SSIS control flow tasks
Task |
Purpose |
Back Up Database |
Back up an entire database to file or tape |
Check Database Integrity |
Perform database consistency checks |
Execute SQL Server Agent Job |
Run a job |
Execute T-SQL Statement |
Run any T-SQL script |
History Cleanup |
Clean out history tables for other maintenance tasks |
Maintenance Cleanup |
Clean up files left by other maintenance tasks |
Notify Operator |
Send e-mail to SQL Server operators |
Rebuild Index |
Rebuild a SQL Server index |
Reorganize Index |
Compacts and defragments an index |
Shrink Database |
Shrinks a database |
Update Statistics |
Update statistics used to calculate query plans |
Table 16-3: SSIS maintenance plan tasks
Container |
Purpose |
For Loop |
Repeat a task a fixed number of times |
Foreach Loop |
Repeat a task by enumerating over a group of objects |
Sequence |
Group multiple tasks into a single unit for easier management |
Table 16-4: SSIS containers
Try It!
To add control flows to the package you've been building, follow these steps:
- If the Toolbox isn't visible already, hover your mouse over the Toolbox tab until it slides out from the side of the BIDS window. Use the pushpin button in the Toolbox title bar to keep the Toolbox visible.
- Make sure the Control Flow tab is selected in the Package Designer.
- Drag a File System Task from the Toolbox and drop it on the Package Designer.
- Drag a Data Flow Task from the Toolbox and drop it on the Package Designer, somewhere below the File System task.
- Click on the File System Task on the Package Designer to select it.
- Drag the green arrow from the bottom of the File System Task and drop it on top of the Data Flow Task. This tells SSIS the order of tasks when the File System Task succeeds.
- Double-click the connection between the two tasks to open the Precedence Constraint Editor.
- Change the Value from Success to Completion, because you want the Data Flow Task to execute whether the File System Task succeeds or not.
- Click OK.
- Select the File System task in the designer. Use the Properties Window to set properties of the File System Task. Set the Source property to DepartmentList. Set the Destination property to DepartmentListBackup. Set the OverwriteDestinationFile property to True then click OK.
Figure 16-6 shows the completed set of control flows.
Figure 16-6: Adding control flows
As it stands, this package uses the file system task to copy the file specified by the DepartmentList connection to the file specified by the DepartmentListBackup connection, overwriting any target file that already exists. It then executes the data flow task. In the next section, you'll see how to configure the data flow task.
SSIS 2008 Tutorial: Building Data Flows
The Data Flow tab of the Package Designer is where you specify the details of any Data Flow tasks that you've added on the Control Flow tab. Data Flows are made up of various objects that you drag and drop from the Toolbox:
- Data Flow Sources are ways that data gets into the system. Table 16-5 lists the available data flow sources.
- Data Flow Transformations let you alter and manipulate the data in various ways. Table 16-6 lists the available data flow transformations.
- Data Flow Destinations are the places that you can send the transformed data. Table 16-7 lists the available data flow destinations.
Source |
Use |
ADO NET |
Extracts data from a database using a .NET data provider |
Excel |
Extracts data from an Excel workbook |
Flat File |
Extracts data from a flat file |
OLE DB |
Extracts data from a database using an OLE DB provider |
Raw File |
Extracts data from a raw file (proprietary Microsoft format) |
XML |
Extracts data from an XML file |
Table 16-5: Data flow sources
Transformation |
Effect |
Aggregate |
Aggregates and groups values in a dataset |
Audit |
Adds audit information to a dataset |
Cache Transform |
Populates a CACHE connection manager |
Character Map |
Applies string operations to character data |
Conditional Split |
Evaluates and splits up rows in a dataset |
Copy Column |
Copies a column of data |
Data Conversion |
Converts data to a different datatype |
Data Mining Query |
Runs a data mining query |
Derived Column |
Calculates a new column from existing data |
Export Column |
Exports data from a column to a file |
Fuzzy Grouping |
Groups rows that contain similar values |
Fuzzy Lookup |
Looks up values using fuzzy matching |
Import Column |
Imports data from a file to a column |
Lookup |
Looks up values in a reference dataset |
Merge |
Merges two sorted datasets |
Merge Join |
Merges data from two datasets by using a join |
Multicast |
Creates copies of a dataset |
OLE DB Command |
Executes a SQL command on each row in a dataset |
Percentage Sampling |
Extracts a subset of rows from a dataset |
Pivot |
Builds a pivot table from a dataset |
Row Count |
Counts the rows of a dataset |
Row Sampling |
Extracts a sample of rows from a dataset |
Script Component |
Executes a custom script |
Slowly Changing Dimension |
Updates a slowly changing dimension table |
Sort |
Sorts data |
Term Extraction |
Extracts data from a column |
Term Lookup |
Looks up the frequency of a term in a column |
Union All |
Merges multiple datasets |
Unpivot |
Normalizes a pivot table |
Table 16-6: Data Flow Transformations
Destination |
Use |
ADO NET |
Sends data to a .NET data provider |
Data Mining Model Training |
Sends data to an Analysis Services data mining model |
DataReader |
Sends data to an in-memory ADO.NET DataReader |
Dimension Processing |
Processes a cube dimension |
Excel |
Sends data to an Excel worksheet |
Flat File |
Sends data to a flat file |
OLE DB |
Sends data to an OLE DB database |
Partition Processing |
Processes an Analysis Services partition |
Raw File |
Sends data to a raw file |
Recordset |
Sends data to an in-memory ADO Recordset |
SQL Server Compact |
Sends data to a SQL Server CE database |
SQL Server |
Sends data to a SQL Server database |
Table 16-7: Data Flow Destinations
If you are running SQL Server Integration Services on a 64-bit machine, the Excel source and destination will throw an exception. During development, you can select Project > Project_name Properties, select the Debugging page and change the Run64BitRuntime property to false. When deploying the package, you'll need to shell out to the 32-bit SSIS runtime when scheduling the package. |
Try It!
To customize the data flow task in the package you're building, follow these steps:
- Select the Data Flow tab in the Package Designer. The single Data Flow Task in the package will automatically be selected in the combo box.
- Drag an OLE DB Source from the Toolbox and drop it on the Package Designer.
- Drag a Character Map Transformation from the Toolbox and drop it on the Package Designer.
- Drag a Flat File Destination from the Toolbox and drop it on the Package Designer.
- Click on the OLE DB Source on the Package Designer to select it.
- Drag the green arrow from the bottom of the OLE DB Source and drop it on top of the Character Map Transformation.
- Click on the Character Map Transformation on the Package Designer to select it.
- Drag the green arrow from the bottom of the Character Map Transformation and drop it on top of the Flat File Destination.
- Double-click the OLE DB Source to open the OLE DB Source Editor. Notice that it uses the Chapter16 OLE DB connection manager by default.
- Select the HumanResources.Department table. Figure 16-7 shows the completed OLE DB Source Editor.
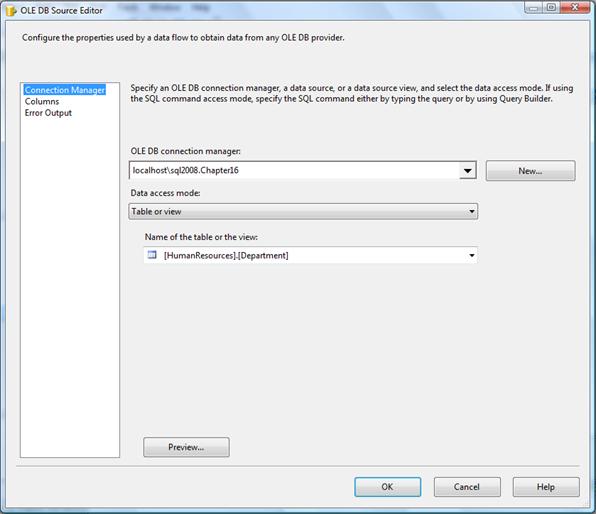
Figure 16-7: Setting up the OLE DB Source
- Click OK.
- Double-click the Character Map Transformation.
- Check the Name column.
- Select In-Place Change in the Destination column.
- Select the Uppercase operation. Figure 16-8 shows the completed Character Map Transformation Editor.
Figure 16-8: Setting up the Character Map Transformation
- Click OK.
- Double-click the Flat File Destination.
- Select the DepartmentList Flat File Connection Manager.
- Select the Mappings page of the dialog box.
- Drag the Name column from the Available Input Columns list and drop it on top of the DepartmentName column in the Available Destination Columns list. Figure 16-9 shows the completed Mappings page.
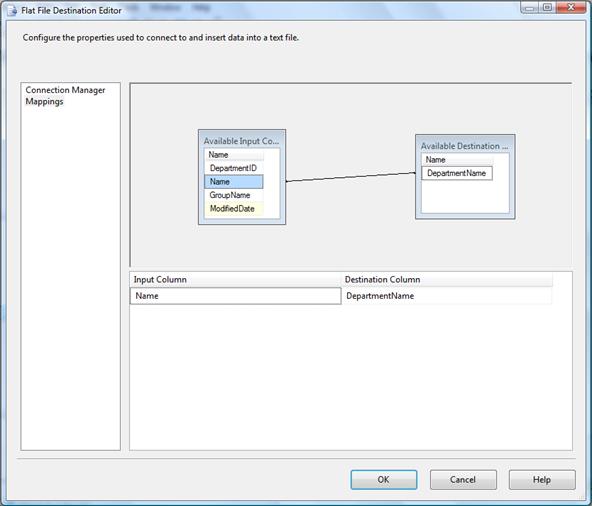
Figure 16-9: Configuring the Flat File Destination
- Click OK.
Figure 16-10 shows the completed set of data flows.
Figure 16-10: Adding data flows
The data flows in this package take a table from the Chapter16 database, transform one of the columns in that table to all uppercase characters, and then write that transformed column out to a flat file.
SSIS 2008 Tutorial: Creating Event Handlers
SSIS packages also support a complete event system. You can attach event handlers to a variety of events for the package itself or for the individual tasks within a package. Events within a package "bubble up." That is, suppose an error occurs within a task inside of a package. If you've defined an OnError event handler for the task, then that event handler is called. Otherwise, an OnError event handler for the package itself is called. If no event handler is defined for the package either, the event is ignored.
Event handlers are defined on the Event Handlers tab of the Package Designer. When you create an event handler, you handle the event by building an entire secondary SSIS package, and you have access to the full complement of data flows, control flows, and event handlers to deal with the original event.
By adding event handlers to the OnError event that call the Send Mail task, you can notify operators by e-mail if anything goes wrong in the course of running an SSIS package. |
Try It!
To add an event handler to the package we've been building, follow these steps:
- Open SQL Server Management Studio and connect to your test server.
- Create a new query and select the Chapter16 database in the available databases list on the toolbar.
- Enter this text into a query window:
CREATE TABLE DepartmentExports(
ExportID int IDENTITY(1,1) NOT NULL,
ExportTime datetime NOT NULL
CONSTRAINT DF_DepartmentExports_ExportTime DEFAULT (GETDATE()),
CONSTRAINT PK_DepartmentExports PRIMARY KEY CLUSTERED
(
ExportID ASC
)
- Click the Execute toolbar button to create the table.
- Switch back to the Package Designer in BIDS.
- Select the Event Handlers tab.
- In the Executable drop-down list, expand the Package node and then the Executables node.
- Select the Data Flow Task in the Executable dropdown list, click OK.
- Select the OnPostExecute event handler.
- Click the hyperlink on the design surface to create the event handler.
- Drag an Execute SQL task from the Toolbox and drop it on the Package Designer.
- Double-click the Execute SQL task to open the Execute SQL Task Editor.
- Select the Chapter16 OLE DB connection manager as the task's connection.
- Set the SQL Statement property to the following query:
INSERT INTO DepartmentExports (ExportTime)
VALUES (GETDATE())
- Click OK to create the event handler.
This event handler will be called when the Data Flow Task finishes executing, and will insert one new row into the tracking table when it is called.
SSIS 2008 Tutorial: Saving and Running Packages
Now that you've created an entire SSIS package, you're probably ready to run it and see what it does. But first, let's look at the options for saving SSIS packages. When you work in BIDS, your SSIS package is saved as an XML file (with the extension dtsx) directly in the normal Windows file system. But that's not the only option. Packages can also be saved in the msdb database in SQL Server itself, or in a special area of the file system called the Package Store.
Storing SSIS packages in the Package Store or the msdb database makes it easier to access and manage them from SQL Server's administrative and command-line tools without needing to have any knowledge of the physical layout of the server's hard drive.
Saving Packages to Alternate Locations
To save a package to the msdb database or the Package Store, you use the File > Save Package As menu item within BIDS.
Try It!
To store copies of the package you've developed, follow these steps.
- Select File > Save Copy of Package.dtsx As from the BIDS menus.
- Select SSIS Package Store as the Package Location.
- Select the name of your test server.
- Enter /File System/ExportDepartments as the package path.
- Click OK.
- Select File > Save Copy of Package.dtsx As from the BIDS menus.
- Select SQL Server as the Package Location.
- Select the name of your test server and fill in your authentication information.
- Enter ExportDepartments as the package path.
- Click OK.
Running a Package
You can run the final package from either BIDS or SQL Server Management Studio. When you're developing a package, it's convenient to run it directly from BIDS. When the package has been deployed to a production server (and saved to the msdb database or the Package Store) you'll probably want to run it from SQL Server Management Studio.
SQL Server also includes a command-line utility, dtsexec, that lets you run packages from batch files. |
Running a Package from BIDS
With the package open in BIDS, you can run it using the standard Visual Studio tools for running a project. Choose any of these options:
- Right-click the package in Solution Explorer and select Execute Package.
- Click the Start Debugging toolbar button.
- Press F5.
Try It!
To run the package that you have loaded in BIDS, follow these steps:
- Click the Start Debugging toolbar button. SSIS will execute the package, highlighting the steps in the package as they are completed. You can select any tab to watch what's going on. For example, if you select the Control Flow tab, you'll see tasks highlighted, as shown in Figure 16-11.
Figure 16-11: Executing a package in the debugger
- When the package finishes executing, click the hyperlink underneath the Connection Managers pane to stop the debugger.
- Click the Execution Results tab to see detailed information on the package, as shown in Figure 16-12.

Figure 16-12: Information on package execution
All of the events you see in the Execution Results pane are things that you can create event handlers to react to within the package. As you can see, DTS issues a quite a number of events, from progress events to warnings about extra columns of data that we retrieved but never used. |
Running a Package from SQL Server Management Studio
To run a package from SQL Server Management Studio, you need to connect Object Browser to SSIS.
Try It!
- In SQL Server Management Studio, click the Connect button at the top of the Object Explorer window.
- Select Integration Services.
- Choose the server with Integration Services installed and click Connect. This will add an Integration Services node at the bottom of Object Explorer.
- Expand the Stored Packages node. You'll see that you can drill down into the File System node to find packages in the Package Store, or the MSDB node to find packages stored in the msdb database.
- Expand the File System node.
- Right-click on the ExportDepartments package and select Run Package. This will open the Execute Package utility, shown in Figure 16-13.
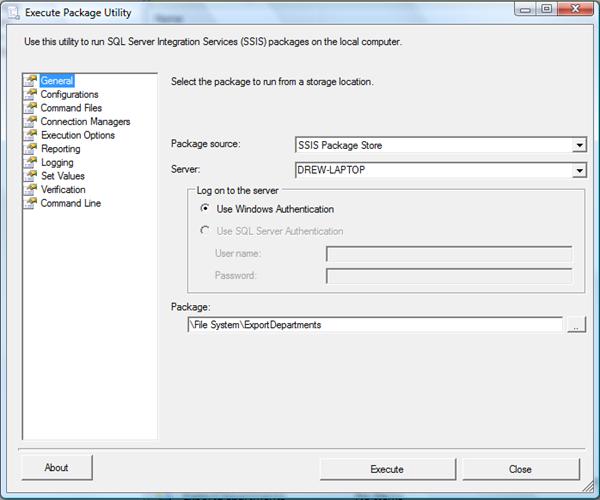
Figure 16-13: Executing a package from SQL Server Management Studio
- Click Execute.
- Click Close twice to dismiss the progress dialog box and the Execute Package Utility.
- Enter this text into a query window with the Chapter16 database selected:
SELECT * FROM DepartmentExports
- Click the Execute toolbar button to verify that the package was run. You should see one entry for when the package was run from BIDS and one from when you ran it from SQL Server Management Studio.
SSIS 2008 Tutorial: Exercises
One common use of SSIS is in data warehousing - collecting data from a variety of different sources into a single database that can be used for unified reporting. In this exercise you'll use SSIS to perform a simple data warehousing task.
Use SSIS to create a text file, c:\EmployeeDept.txt, containing the last names, department names, start and end dates of the AdventureWorks2008 employees. Retrieve the last names from the Person.Person table and the department start and end dates from the HumanResources.EmployeeDepartmentHistory table in the AdventureWorks2008 database, and the department names from the Chapter16 database.
You can use the Merge Join data flow transformation to join data from two sources. One tip: the inputs to this transformation need to be sorted on the joining column.
Solutions to Exercises
- Launch Business Intelligence Development Studio
- Select File > New > Project.
- Select the Business Intelligence Projects project type.
- Select the Integration Services Project template.
- Select a convenient location.
- Name the new project ISProject2 and click OK.
- Right-click in the Connection Managers area of your new package and select New OLE DB Connection.
- Click New to create a new data connection.
- In the Connection Manager dialog box, select the SQL Native Client provider.
- Select your test server and provide login information.
- Select the AdventureWorks2008 database.
- Click OK.
- Right-click in the Connection Managers area of your new package and select New OLE DB Connection.
- Select the existing connection to the Chapter16 database and click OK.
- Right-click in the Connection Managers area of your new package and select New Flat File Connection.
- Enter EmployeeList as the Connection Manager Name.
- Enter C:\EmployeeDept.txt as the File Name.
- Check the Column Names in the First Data Row checkbox.
- Click the Advanced icon to move to the Advanced page of the dialog box.
- Click the New button.
- Change the Name of the new column to LastName.
- Click the New button.
- Change the Name of the new column to Department.
- Click the New button.
- Change the Name of the new column to StartDate and the datatype to Date.
- Click the New button.
- Change the Name of the new column to EndDate and the datatype to Date.
- Click OK.
- Select the Control Flow tab in the Package Designer.
- Drag a Data Flow Task from the Toolbox and drop it on the Package Designer.
- Select the Data Flow tab in the Package Designer. The single Data Flow Task in the package will automatically be selected in the combo box.
- Drag an OLE DB Source from the Toolbox and drop it on the Package Designer.
- Drag a second OLE DB Source from the Toolbox and drop it on the Package Designer.
- Drag a Sort Transformation from the Toolbox and drop it on the Package Designer.
- Drag a second Sort Transformation from the Toolbox and drop it on the Package Designer.
- Drag a Merge Join Transformation from the Toolbox and drop it on the Package Designer.
- Drag a Flat File Destination from the Toolbox and drop it on the Package Designer.
- Click on the first OLE DB Source on the Package Designer to select it.
- Drag the green arrow from the bottom of the first OLE DB Source and drop it on top of the first Sort Transformation.
- Click on the second OLE DB Source on the Package Designer to select it.
- Drag the green arrow from the bottom of the second OLE DB Source and drop it on top of the second Sort Transformation.
- Click on the first Sort Transformation on the Package Designer to select it.
- Drag the green arrow from the bottom of the first Sort Transformation and drop it on top of the Merge Join Transformation.
- In the Input Output Selection dialog box, select Merge Join Left Input.
- Click OK.
- Click on the second Sort Transformation on the Package Designer to select it.
- Drag the green arrow from the bottom of the second Sort Transformation and drop it on top of the Merge Join Transformation.
- Click on the Merge Join Transformation on the Package Designer to select it.
- Drag the green arrow from the bottom of the Merge Join Transformation and drop it on top of the Flat File Destination. Figure 16-14 shows the Data Flow tab with the connections between tasks.
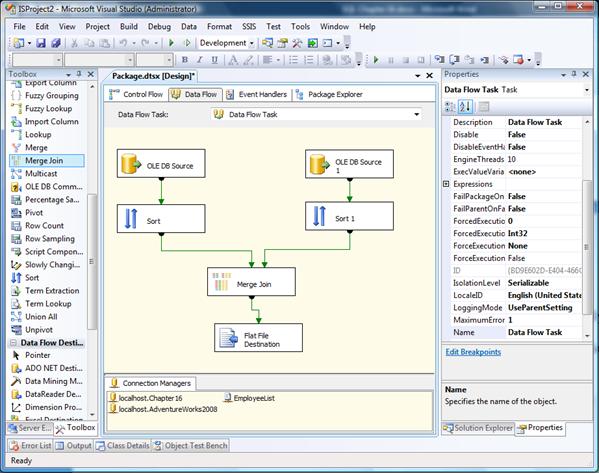
Figure 16-14: Data flows to merge two sources
- Double-click the first OLE DB Source to open the OLE DB Source Editor.
- Select the connection to the AdventureWorks2008 database.
- For the Data Access Mode, select SQL Command.
- Enter the following query:
SELECT p.LastName, dh.DepartmentID, dh.StartDate, dh.EndDate
FROM Person.Person p
INNER JOIN HumanResources.EmployeeDepartmentHistory dh
ON p.BusinessEntityID = dh.BusinessEntityID
- Click OK.
- Double-click the second OLE DB Source to open the OLE DB Source Editor.
- Select the connection to the Chapter16 database.
- Select the HumanResources.Department table.
- Click OK.
- Double-click the first Sort Transformation.
- Check the DepartmentID column.
- Click OK.
- Double-click the second Sort Transformation.
- Check the DepartmentID column.
- Click OK
- Double-click the Merge Join Transformation.
- Check the Join Key checkbox for the DepartmentID column in both tables, if not already checked.
- Check the selection checkbox for the LastName, StartDate and EndDate columns in the left-hand table and the Name column in the right-hand table; alias the Name column as DepartmentName. Figure 16-15 shows the completed Merge Join Transformation Editor.
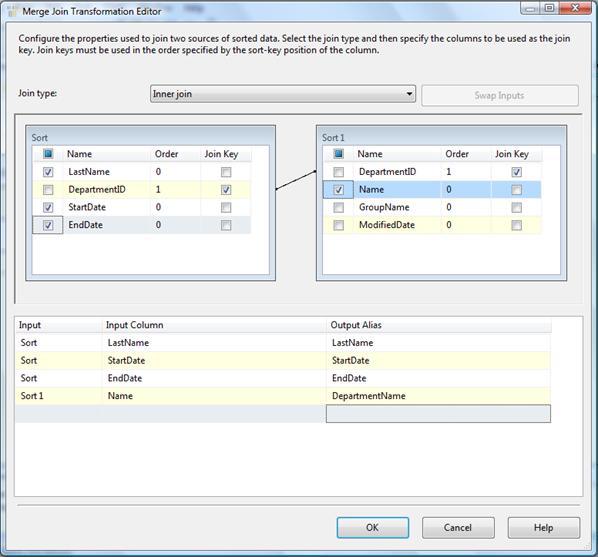
Figure 16-15: Setting up a Merge Join
- Click OK.
- Double-click the Flat File Destination.
- Select the EmployeeList Flat File Connection Manager.
- Select the Mappings page of the dialog box.
- The LastName, StartDate and EndDate columns will be automatically mapped. Drag the DepartmentName column from the Available Input Columns list and drop it on top of the Department column in the Available Destination Columns list.
- Click OK.
- Right-click the package in Solution Explorer and select Execute Package.
- Stop debugging when the package is finished executing.
- Open the c:\EmployeeDept.txt file to inspect the results.
In-Depth SSIS Training
For in-depth SSIS training, click here to view all of Accelebrate's SSIS training courses for you and your staff.
Request Pricing |

