Support for Block as Property in the Episerver Content Delivery API

Since Episerver 7, CMS has support to add Blocks as Properties. This helps you to group Properties easier as well as reusing code.

Unfortunately the Episerver Content Delivery API does not support these blocks. They are simply not serialized into the JSON response.

In my example I will use the StartPage from the Alloy Templates that has the Block SiteLogotypeBlock added as a Property:

public virtual SiteLogotypeBlock SiteLogotype { get; set; }

When I use the Content Delivery API to request the Start Page, I don’t see it in the JSON response.

no logo

The structure of Block as Property

Without digging too deep into how Episerver structure the Blocks when they are added as properties, you can find that the PropertyData for the SiteLogotypeBlock is defined as BlockProperty.

Normally I would simply need to create a PropertyModel that handles BlockProperty and handles the Block property values similar to how I add PropertyModels with complex value models.

But I don’t want to do that for every Block Type that might be added as a Block!

Extending with a PropertyModelConverter

Fortunately, all BlockProperty inherit from BlockProperty!

This makes it easier for me to create my own PropertyModelConverter (the part responsible of finding a PropertyModel for the PropertyData) and check if the current PropertyData is assignable from BlockProperty.

Default:

propertyModel.PropertyType == propertyData.GetType()

Which does not consider heritance.

My implementation:

propertyData is PropertyBlock;

With this, I can take any BlockProperty into my own PropertyModel.

The BlockPropertyModel

What I did was to create a PropertyModel that is using the ContentModelMapper to serialize the Block. This is the same function that is used to make the requested Content into a serializable model.

Unfortunately the ContentModelMapper can only handle IContent. PageData implements IContent and so does Blocks that are created in the Assets Pane due to Episerver’s runtime proxy.

However Blocks that are added as Properties does not implement IContent.

Dirty workaround ;)

So how can I ask the ContentModelMapper to map my non-IContent Block? This is not the best solution I’ve found but I ask the IContentRepository to create a Default instance of the Block Type in the same way as if I would create a block programmatically.

var fakeContent = this.contentRepository.GetDefault(ContentReference.SiteBlockFolder, contentTypeId);

After that I copy all of the property values from the original Block into my fake instance.

var propertyDataCollection = block.Property.CreateWritableClone();
foreach (var propertyData in propertyDataCollection)
{
    fakeContent.Property.Set(propertyData.Name, propertyData);
}

And finally I ask the ContentModelMapper to map this into a ContentModel.

this.contentModelMapper.TransformContent((IContent)fakeContent);

After cleaning upp things that I don’t really need like Name, ParentLink etc. I can use this as the Value of the PropertyModel.

Summary

To be able to accomplish this, I needed to be able to find a way to handle all different types of PropertyBlocks and be able to serialize the actual Block Types.

Using the BlockPropertyModelConverter I am able to map the BlockProperty of any type into my BlockPropertyModel, which in turn use BlockModelMapper to create a serializable model using the normal ContentModelMapper.

Now I will get any Block that is added as a Property serialized as JSON into the Content Delivery API Response!

logo

If you want to understand more about the Episerver Content Delivery API serializing, you can read it in the documentation.

Prevent Episerver ContentDelivery to hijack all application/json requests

In one of my projects where we are using the Content Delivery API from Episerver, we also have some custom logic in the templates for some Ajax posting.

A JavaScript makes a POST request to the current url and expects a json response, therefore the request has an Accept Header with the value: application/json.

contentdeliveryapi post request

Issue

This will respond with a 405 error with the message HTTP verb used to access this page is not allowed.

405 error.PNG

This might not be best practise to shoot XHR requests to the same request and manage the response in the same code that also handles the HTML rendering, but that is how it was build back then.

Looking into the binaries, I managed to find that this is caused by something in the EPiServer.ContentApi.Cms.dll binary.

Cause

I used DotPeek to look what’s going on in that file and could see that on initialization, the ContentDelivery attaches to the RoutedContent event on the IContentRouteEvents interface.

When content is Routed the method ContentApiRouteService.ShouldRouteRequest is used to check whether or not this request should be rewritten to use the ContentDelivery API instead.

The default implementation of ContentApiRouteService checks whether the Accept Header contains “application/json”. Which is the case for of our current implementation.

With rewritten I mean that instead of the normal request destination which usually is your WebForms ASPX template or MVC Controller, the request should be routed to the ContentDelivery API at /api/episerver/v2.0/.

Solution

As we are depending on the request to reach our template, we need to disable this. The best way I could find is to override the ContentApiRouteService .ShouldRouteRequest method.

I replaced it with a method that just returned false. I never want the request to be routed to the ContentDelivery API. When I use the ContentDelivery API, I use the endpoint found at /api/episerver/v2.0.

You can find how I override the implementation of ContentApiRouteService at GitHub together with how I replace it in the IoC container using a Configurable Module.

Personally I think this is a case where Episerver disturbs our default rendering and I would prefer that

1) the ContentDelivery routing for requests with Accept Header “application/json” is an opt-in configuration as it is interfering with our

2) or that the routing is configurable so that I can opt-out without having to write code that overrides the default behaviour

Getting a previewable property value with UIHint.PreviewableText

You might have seen that the field “Name in URL” first gives you the value and the editor needs to click “change” to edit it.
nameinurl

You can also accomplish this on your normal string properties by using the UI Hint “previewabletext” (also found as the constant UIHint.PreviewableText).

[Display(Name = "My Property")]
[UIHint(UIHint.PreviewableText)]
public virtual string MyProperty { get; set; }

And it will look like this:
previewable

Adding ImageVault buttons to TinyMCE 2 in Episerver

With the new TinyMCE version in Episerver 11, there are some new changes on how to set up your toolbars.

Episerver has documented it quite well and how you set it up in the back end is quite similar to how you would set it up using TinyMCE’s JavaScript API.

But it took a while until I could find how to add my ImageVault buttons.

Finally I found that I need to add these:

  • imagevault-insert-media
  • imagevault-edit-media

They will give you the ImageVault buttons you’ve always been waiting for!

Tweaking and extending serialization from Episerver Content Delivery API

As you’ve probably heard, Episerver is creating a Headless CMS API called “Content Delivery API“.

With this, you can get, list and search (requires Episerver Find) content from Episerver in a JSON format.

Matthew Mols has some blog posts about how to get started: Getting started with the Episerver Content Delivery API and Add HTTP Caching to the Episerver Content Delivery API.

I just started looking at it myself and found some basic ways how to tweak the output of the API when it comes to Content and Properties.

Basics

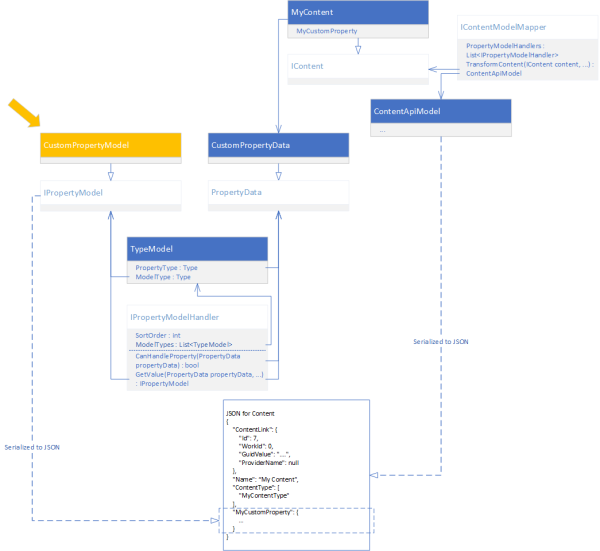
A simplified description of what you get from the API is a JSON serialized ContentApiModel. ContentApiModel is basically a copy of the Content populated depending on what content interfaces your content implements.

The model returned is

  • If the content implements ILocale, set the Language property
  • If the content implements ILocalizable, set the MasterLanguage and ExistingLanguage properties
  • If the content implements IVersionable, set the properties StartPublish, StopPublish as well as Status
  • If the content implements ICategorizable, add a CategoryPropertyModel to the ContentApiModel.Properties property

Also, for each PropertyData in your Content.Property try to find a registered IPropertyModelHandler that has an TypeModel that can handle the Property Type.

TypeModel you say?

The TypeModel contains three things:

Type Name Description
Type PropertyType Which Property Type this TypeModel can support. For example PropertyContentReference, PropertyXhtmlString etc.
Type ModelType The type of the class that takes care of the rendering. Needs to implement the Interface IPropertyModel.
string ModelTypeString The name of the PropertyModel, normally the same name as the name of the ModelType.

PropertyModel

This is a ContentDelivery version of the PropertyData. This is what is rendered as a JSON for each Property on your Content.

For example the PropertyNumber would be represented by NumberPropertyModel. The NumberPropertyModel has a Value (the numeric value of your property) and a PropertyDataType which usually is the name of the value type (in this case “PropertyNumber”).

How do I add Custom Properties or replace the JSON output?

Adding for new Properties

For example if I’d be using ImageVault including their custom Property Types, the property won’t be displayed as no IPropertyModelHandler that can handle PropertyMedia.

Instead of creating your own implementation of IPropertyModelHandler, you can just add more TypeModels to the existing one in an InitializationModule.

So let’s add a ModelType for PropertyMedia in the InitializationModule. Mimicking how Episerver handles their common Property types, the JSON output will look like this:

"Image": {
    "Value": {
        "Id": 33114,
        "Effects": [],
        "IsReadOnly": true,
        "IsModified": false
    },
    "PropertyDataType": "PropertyMedia"
}

Which isn’t really helpful since ImageVault images are not served as content so we can’t use that ID with the ContentDeliveryApi. We need to add a little extra information so let’s create a new PropertyModel that will wrap the MediaReference, but also add a Url to the image.

Replacing for existing Properties

This is the same procedure but instead of creating a new TypeModel, just replace the value of the ModelType property with an own Type in the InitializationModule.

Check an example of InitializationModule to add or replace properties.

The toolbox for PropertyModels

There are some nice base classes that you can play with. The key Interface you need to work with is the IPropertyModel:

IPropertyModel

This is the most basic Interface that you need to implement according to the default PropertyModelHandler. It only contains two properties:

Type Name Description
string Name The name of the Property Model, usually the name of the Episerver Property type.
string PropertyDataType The name of the Property Model, usually the name of the Episerver Property type.

What I can see when reflecting Episerver’s code, it seems like your implementation also need a constructor with a parameter with the PropertyData.

public class MyPropertyModel : IPropertyModel
{
    public MyPropertyModel(MyPropertyData property)
    {
        // Do something to the property, and add the output to Properties for serialization
    }

    public string Name { get; set; }
    public string PropertyDataType { get; set; }
}

For your convenience, Episerver have a base class for this: EPiServer.ContentApi.Core.PropertyModel where TValue is the value you should output in your JSON, and TType is the PropertyData. Check some examples where I’m serializing the Property value or even serializing with extra information.

As the PropertyModel is serialized to a JSON, all properties on your implementation will be included in the result (except if you decorate the property with the JsonIgnore attribute – see below).

IPersonalizableProperty

If the output of your Custom Property depends on personalization, implement the IPersonizableProperty. The interface only requires a Property called ExcludePersonalizedContent, but it seems like your implementation need a constructor with the PropertyData AND a boolean.

public class MyPersonalizedPropertyModel : IPropertyModel, IPersonizableProperty
{
    public MyPersonalizedPropertyModel(MyPropertyData property, bool excludePersonalizedContent)
    {
        if (excludePersonalizedContent)
        {
            // add logic to exclude personalized content
        }
    }

    public string Name { get; set; }
    public string PropertyDataType { get; set; }
    public bool ExcludePersonalizedContent { get; set; }
}

For your convenience, Episerver also have a base class for this: EPiServer.ContentApi.Core.PersonalizablePropertyModel where TValue is the value you should output in your JSON, and TType is the PropertyData.

IExpandableProperty

IExpandabeProperty is used for properties that where you can return a simplified set of data for the initial API Request, so that the Client can make further requests to dig deeper into the data.

ContentAreas and ContentReferences are two examples for this. The first response for a ContentArea would look like this:

"MyContentArea": {
    "Value": [
        {
            "ContentLink": {
                "Id": 9,
                "WorkId": 0,
                "GuidValue": "5f3d81e6-28f8-4f16-b998-87378fc9c4d6",
                "ProviderName": null
            },
            "DisplayOption": "",
            "Tag": null
        }
    ],
    "PropertyDataType": "PropertyContentArea"
}

But if it would be expanded by having the parameter ?expand=Steps or ?expand=*, the JSON output for the ContentArea would look like this:

"MyContentArea": {
    "ExpandedValue": [ // When expanding, expanded information goes here
        {
            "ContentLink": {
                "Id": 9,
                "WorkId": 0,
                "GuidValue": "5f3d81e6-28f8-4f16-b998-87378fc9c4d6",
                "ProviderName": null
            },
            "Name": "My Block",
            "Language": {
                "DisplayName": "English",
                "Name": "en"
            },
            "ExistingLanguages": [
                {
                    "DisplayName": "English",
                    "Name": "en"
                }
            ],
            "MasterLanguage": {
                "DisplayName": "English",
                "Name": "en"
            },
            "ContentType": [
                "Block",
                "MyBlock"
            ],
            "ParentLink": {
                "Id": 8,
                "WorkId": 0,
                "GuidValue": "87a9ae8a-a2a8-40e5-8c09-5c5c55a73e17",
                "ProviderName": null
            },
            "RouteSegment": null,
            "Url": null,
            "Changed": "2018-04-09T16:05:01Z",
            "Created": "2018-04-09T16:05:01Z",
            "StartPublish": "2018-04-09T16:05:01Z",
            "StopPublish": null,
            "Saved": "2018-04-09T16:05:34Z",
            "Status": "Published",
            "Category": {
                "Value": [],
                "PropertyDataType": "PropertyCategory"
            },
            // Other properties goes here
        }
    ],
    "Value": [ // Here goes the original value before expanding
        {
            "ContentLink": {
                "Id": 9,
                "WorkId": 0,
                "GuidValue": "5f3d81e6-28f8-4f16-b998-87378fc9c4d6",
                "ProviderName": null
            },
            "DisplayOption": "",
            "Tag": null
        }
    ],
    "PropertyDataType": "PropertyContentArea"
}

Note that expanding will only dig through the first level of nested Content.

[JsonIgnore]

If you have Properties on your ModelType that you don’t want to be included in the JSON output, just decorate it with the JsonIgnore Attribute.

Summary

I hope you learned something new about Episerver’s Content Delivery API. It’s still kind of new and the documentation is not very good yet.

If you have any tips and tricks, feel free to blog about it and give me a shout! Always nice learning something new!

Differences between DeletingContent/DeletedContent between emptying trash and deleting content

We stumbled upon an area where the DeletingContent and DeletedContent events slightly differently when you’re deleting content through the IContentRepository, manually emptying the trash and the scheduled job “Automatic Emptying of Trash”.

Let’s look at what the DeletingContent and DeletedContent events are.

There are multiple articles and blog posts that mention this but simply these are simple event delegates when content are changed. In this case I’m interested in to do things when content is deleted. Note that moving something to the Trash in the UI is not considered as “deleting content”.

Just add an InitializationModule and hook up your events:

[InitializableModule]
[ModuleDependency(typeof(EPiServer.Web.InitializationModule))]
public class InitializationModule : IInitializableModule
{
    public void Initialize(InitializationEngine context)
    {
        var contentEvents = ServiceLocator.Current.GetInstance();
        contentEvents.DeletingContent += OnDeletingContent;
        contentEvents.DeletedContent += OnDeletedContent;
    }

    private void OnDeletedContent(object sender, DeleteContentEventArgs deleteContentEventArgs)
    {
    }

    private void OnDeletingContent(object sender, DeleteContentEventArgs deleteContentEventArgs)
    {
    }

    public void Uninitialize(InitializationEngine context)
    {
    }
}

As you can see there is a class called “DeleteContentEventArgs“. This contains information for the content:

Name Summary
CancelAction Set value to abort the current event handling
CancelReason Gets or sets the reason for cancel.
Content The content that the event applies to
ContentLink The Content that the event applies to
Creator This property keeps track of the class/instance that created the page object.
DeletedDescendents Gets or sets a list of references to any descendents that will also be deleted from this delete operation.
Items Gets a key-value collection that can be used to organize and share data between events handlers during an event chain.
RequiredAccess The required access that the event applies to.
TargetLink The parent that the event applies to

Compared to most other Content Events, the DeleteContentEventArgs.Content property is null. If you’re insterested in the content you are deleting, you’ll need to use IContentLoader to get it based on DeleteContentEventArgs.ContentLink.

The special thing with DeleteContentEventArgs is that the DeleteContentEventArgs.DeletedDescendents contains ContentReferences for all content that are descendants to the content that are to be deleted.

Here is what’s different depending on how you’re deleting

IContentRepository.Delete

Let’s start with the easy thing. IContentRepository.Delete to delete your content.

var pageReference = new PageReference(133);
var contentRepository = ServiceLocator.Current.GetInstance();
contentRepository.Delete(pageReference, false);

In this case, the ContentLink is the page you’re deleting is added to DeleteContentEventArgs.ContentLink and all content beneath the content are added to the DeleteContentEventArgs.DeletedDescendents property, similar to the image above.

Scheduled Job: Automatic Emptying of Trash

This job deletes all content that was moved to the Trash more than 30 days ago.

For each child to the Trash node (usually Id 2), delete it and the DeleteContentEventArgs.ContentLink is set to that child. All content beneath that child are added to the DeletedDescendents property.

Quite straight forward, right?

Manually emptying Trash

This is where things are different.

Instead of setting DeleteContentEventArgs.ContentLink to the content that are to be deleted, the ContentReference to the Trash node is set to DeleteContentEventArgs.ContentLink.

Summary

If you’re interested in doing something when a piece of content is deleted, for example a specific Content Type, remember to check the ContentLink as well as the DeletedDescendents.

Automatic visual tests with Episerver: Prepare your conditions with Content Providers

In my previous post I talked about how to set up automatic visual tests – and for a time, it was good. Then editors and other team members starts changing the content and your tests starts showing deviations based on content changes rather than code changes.

Yes, you can set up rules on not changing areas included in the tests, but can you really trust everyone?

To get around this, I started working on a set of Content Providers that will give a static set of content. Kind of like when you’re creating unit tests and mocking implementations for interfaces:

public interface IService {
   string Get(int id);

   string[] List();
}
var mockService = new Mock<IService>(); // Start mocking the interface "IService"

mockService
   .Setup(s => s.Get(It.IsAny<int>())) // Parameter is any integer
   .Returns((string)null); // Return null
mockService
   .Setup(s => s.Get(10)) // But if parameter is 10
   .Returns("alf"); // Return "alf"

mockService
   .Setup(s => s.List()) // When calling List()
   .Returns(new[] { "alf" }); // Return an array that only contains "alf"

IService service = mockService.Object; // Done mocking the interface and create an instance of it

Now let’s create a Test Class to verify that everything Works before building the real implementation of IService.

// Assert that the mocked instance returns what we expect
Assert.AreEqual("alf", service.Get(10));
Assert.IsNull(service.Get(1));

var list =service.List();
Assert.AreEqual(1, list.Length);
Assert.AreEqual("alf",list[0]);

Based on the content types in Alloy Templates I have a sample of the Content Provider that sets up examples of the pages and blocks that I want to test.

Separate project for Models

First of all when I create an Episerver solution, I want to have all Episerver Model related in a separate project. That way I can easier separate code that belongs to presentation (the actual MVC web project) from code that belongs to business logic.

After I have created a standard Alloy Template solution called Toders.VisualTests.Web I move all Content Types and Episerver specific assets that are tightly connected to the Content Types (Attributes, or similar) into a specific Models project.

For Alloy there are also some interfaces, Global constant strings and similar that I need to move so that the project compiles properly. Check my commit in GitHub to see the moved files.

Creating the Content Providers

Once I have moved the Models into a separate project, I can create a separate project that will contain my Content Providers.

As the Episerver content structures for Assets (Blocks and Media) and Pages are separate. I will need to create two separate Content Providers, the AssetProvider and PageProvider.

AssetProvider

In the AssetProvider I create the structure for Media and Blocks that will be used on the Pages. It contains an AssetModel so that I can use the created static assets on my Pages.

PageProvider

In the PageProvider I create the structure of the pages that are to be tested. I can create pages that contain Blocks and Media from the ContentProvider.

As you can see I am using the AssetModel to deliver the created assets into the Page Provider.

Initiating everything

To get everything working, I need to create some new Content Types that will act as roots for my Content Providers – StaticStartPage for the Pages and StaticAssetsRootFolder. This is to easier identify which content to use as roots for my Content Providers.

Once the Content Types are created, I create a Start Page for my static content and . With the current implementation, I’ll need to restart my website because I will set up the static website on initialization.

At startup, I have an InitializationModule that checks whether a Page of the type StaticStartPage is created, ensures that there is a Folder of the type StaticAssetsRootFolder and initializes the AssetProvider and PageProvider. The reason I let them implement the original Start Page and ContentFolder is to

After initialization, the module also ensures that there is a SiteDefinition created that is using the static start page as start page.

Finally I need to set up my IIS server to listen to the url for the SiteDefinition (per default is it set to localhost:2335, but can be updated to anything in the Admin Mode).

Testing it

Finally I need to create some tests. This part is what I show in my previous blog post about Automatic visual tests.

For this article I’m using some other tests where I have split the implementation between just doing screenshots with PhantomJS and an implementation that user AppliTools Eyes.

Summary

Currently I’m testing what some content with various Display Options looks like what in a Content Area. I also look what text in different formats looks like.

If I would receive a bug report from my editors that bold text within a bullet list looks weird, I can in a TDD behaviour add it to the Page Provider and verify it with my tests:

Before:

var mainBody = "<h2>Header 2</h2>" +
    "<h3>Header 3</h3>" +
    "<p>Paragraph with <strong>strong</strong> and <em>italic</em> text. Also a <strong><em>combination</em></strong>.</p>" +
    "<ul>"+
    "<li>Bullet 1</li>" +
    "<li>Bullet 2</li>" +
    "<li>Bullet 3</li>" +
    "</ul>" +
    "<ol>"+
    "<li>Numbered 1</li>" +
    "<li>Numbered 2</li>" +
    "<li>Numbered 3</li>" +
    "</ol>";

    page.MainBody = new XhtmlString(mainBody);

After:

var mainBody = "<h2>Header 2</h2>" +
    "<h3>Header 3</h3>" +
    "<p>Paragraph with <strong>strong</strong> and <em>italic</em> text. Also a <strong><em>combination</em></strong>.</p>" +
    "<ul>"+
    "<li>Bullet 1</li>" +
    "<li>Bullet 2</li>" +
    "<li>Bullet 3</li>" +
    "<li><strong>Fat text</strong></li>" +
    "</ul>" +
    "<ol>"+
    "<li>Numbered 1</li>" +
    "<li>Numbered 2</li>" +
    "<li>Numbered 3</li>" +
    "</ol>";

    page.MainBody = new XhtmlString(mainBody);

I hope this gives you some inspiration on how to improve your QA and tests on your website. Of course having a separate website requires that you have a License that allows for multiple websites. This can be achieved using sub pages to your already existing websites, but there’s a risk that you can’t have a fully testable copy of your original website.

You can download the code from GitHub, and set it up with the following steps:

  • Set up a standard Alloy Templates database and adjust the connectionstrings.config
  • Set up an IIS server pointing to the src\Alloy.MVC.Template folder on your drive, make sure that it has two bindings – one for the ordinary Alloy Website and one for your static content
  • Make sure that the InitializationModule are using the correct url for the static website in the field StaticWebsiteUrl in the top of the class
  • Create a page of the type “Static Start Page” under the root page
  • Unfortunately you’ll need to restart the website so that the Site Definition will come in place

Workaround that ImageVault.EPiServer.UI 5.5.36 does not support non-standard ports

We have upgraded the NuGet package ImageVault.EPiServer.UI to 5.5.36.

This package is used to install ImageVault properties and editor UI into Episerver.

However I noticed that I was unable to add images to the ImageReference properties in Episerver. The “Insert” button was replaced with “Publish”.

iv insert.png

Looking into the javascript errors I found the following:

imagevault-insert-media.min.js:1 Failed to execute 'postMessage' on 'DOMWindow': The target origin provided ('https://my-imagevault-core') does not match the recipient window's origin ('https://my-imagevault-core:9901').

As we’re hosting our ImageVault Core on a non-standard port 9901 it looked like something was lost.

Browsing the zip packaged containing the ImageVault UI resources I found the javascript imagevault-insert-media.min.js that it does not include the port when defining the origin.

Patching it up

It was easy to patch the .js file but since I did not want to fool around with the .zip package, I needed to find another way to override the file.

Creating a HttpHandler that listened to the path for the original file, and returning my modified file instead it’s easy for me to implement my fix without the risk of it being overriden. It’s also easy to remove when the fix is patched!

If you need help

If you also experienced this issue, you can find my patch on https://github.com/alfnilsson/ImageVault/tree/master/ImageVault.EPiServer.UI%205.5.36

As it would only be a temporary patch, I don’t think it’s worth creating a nuget package for it.

This is reported to Meriworks, but I hope that this helps you if you encountered the same problems.

Automatic visual tests with Episerver: Test after a Deploy

A common reason I have heard that Episerver developers don’t write automatic tests are that they’re “only doing content websites”.

First of all I suggest that you have an “API first” approach, even if you’re only going to make content based functionality such as listing and filtering News Entries.

This falls well into the classic three tier layer where you separate data, logic and presentation.

3tier.png

But that’s not what I want to share today. I’m here to talk about Visual Tests!

Visual tests

With visual tests I mean that you’re comparing what your website looks like before and after a release. This is normally done just by performing a test routine – following steps such as clicking links or buttons, entering form fields and so on.

This is something that can take far too much time and energy and within a DevOps mindset you want to automate these tasks as much as possible.

automate.png

Selenium

The first tool I use for automatic visual tests is Selenium which is a tool where you can script a web browser to do basically anything.

You can use various techniques to create your automated scripts, either coding them with many different languages (C#, Python, Ruby or even Perl, JavaScript and PHP).

You can also use your scripts with different web drivers which are available for most modern browsers on the most popular Operating Systems out there. This is very good when you want to make sure that the same function works and looks the same on Microsoft Edge, Firefox, Chrome and so on.

A simple piece of code to browse to a website using the Chrome browser and take a screenshot.

using (IWebDriver driver = new ChromeDriver())
{
    driver.Manage().Window.Size = new Size(1280, 980);
    driver.Url = "http://www.alfnilsson.se";
    ((ITakesScreenshot)driver).GetScreenshot().SaveAsFile(@"c:\temp\www.alfnilsson.se.png", ScreenshotImageFormat.Png);
}

Simple as that. Next problem is that it would take too much time to compare screenshots and there is a risk of the human error. Missing that the font might be wrong or that the margin is a few pixels too large or small.

Simplify comparison with Applitools Eyes

For one of our customers we’re using Applitools Eyes to help us compare the screenshots.

It is a tool where you can create test cases and compare screenshots between different test rounds and get a warning if there is something different between each round.

If you get a warning you can say yes or no whether the change was OK, and if you want to use this screenshot as base for an upcoming comparison.

So what we do in our code is instead of creating a screenshot with the WebDriver, we wrap our WebDriver with the Eyes API.

So with this code we’re doing the same test as previously, but instead of saving the screenshot to disk, we’re starting a test in Eyes and sends the screenshot of our start page.

using (IWebDriver driver = new ChromeDriver())
{
    var eyes = new Eyes
    {
        ApiKey = "--APIKEY--"
    };

    eyes.Open(driver, "My Application", "My Test");

    driver.Manage().Window.Size = new Size(1280, 980);
    driver.Url = "http://www.alfnilsson.se";
    eyes.CheckWindow("Start Page");
    eyes.Close();
}

If there’s any differences, the API will throw an Exception with information on where to verify the screenshots. We can also adjust the code to not throw Exceptions in case we want to.

Automatic Visual Tests after a Release

At the latest Episerver Partner Close Up earlier this year, Eric Herlitz and I had a presentation about DevOps where we showed how you can use your automatic tests as an automated step while deploying.

We implemented these visual tests with the simple tests. Note that some of the screenshots and code are not best practice in a release and test setup but this was enough for demo cases.

1: Create a normal Alloy Website solution

Just use the Episerver Visual Studio Templates to create a standard Alloy Website.


2: Switch the WebDriver to use Phantom JS

As the visual tests will be performed on a TFS agent outside a user context, it is better to use the Headless browser “Phantom JS”. It’s a browser that does not have a UI, but can render and take screenshots of websites as if it was a normal browser.

Simply install the NuGet packages required for Phantom JS and use the OpenQA.Selenium.PhantomJS.PhantomJSDriver instead.

3: Put the code inside a Test Project

Create a Test Project in your solution and start scripting.

In my tests I am performing the following steps

  1. Browse to the start page
  2. Send a screenshot to Eyes
  3. Browe to the contact page which contains a contact form built with Episerver Forms
  4. Send a screenshot to Eyes
  5. Submit the form, expecting that some validation messages should show for the required fields
  6. Send a screenshot to Eyes
  7. Fill in the field for name and enter an invalid e-mail address into the e-mail field.
  8. Submit the form, expecting that some validation messages should show for the invalid e-mail
  9. Send a screenshot to Eyes
  10. Finish the e-mail address, check some checkboxes and a comment.
  11. Send a screenshot to Eyes
  12. Submit the form, expecting that the form should be submitted and a confirmation message to be displayed
  13. Send a screenshot to Eyes

I have uploaded our tests scripts to my GitHub. In these steps I have made sure that the tests does not throw Exceptions if Eyes notices any differences.

4: Push the code to VSTS and setup VSTS Build to Publish the Artifacts for the test project

Just push your code to a repository in your VSTS, or to a repository that is accessible by VSTS (such as GitHub).

Setup VSTS to build your solution.

vsts build.png

Looking closer at the task for publishing the test project you can see that the artifacts are called “VisualTests”. We will use this later.vsts publush tests.png

5: Deploy to Azure using VSTS

Create the Azure Resources required for running an Episerver website. this blog post from Erik Henningson contains some Powershell scripts that makes it very easy to get everything up and running.

Me and Eric are more used to using Octopus Deploy for Release Management but we decided to use the VSTS Release Management for our demo.

The steps are quite simple:

vsts release 1.png

  1. Get the code from the Artifacts
  2. Put the code to the Azure website that represents my Dev environment (including some configuration transformation)

In a real project I would also add environments for Test, Pre-prod and Production (or simply the Integration environment if I was running DXC Services).

6: Add the Release Step to run your Tests from the artifact “VisualTests”

I added the step to also run the tests from the Artifact “VisualTests”. It will simply run the tests which in turn will start pushing screenshots to AppliTools Eyes.vsts release 2.png

After the deploy, I let my Release Managers approve the release before it can continue on in the Release Life Cycle.

vsts release 3.png

This is so that the manager can verify that everything works as intended without manually performing the test procedures.

Summary

These are the basics of setting up Automatic Visual Tests using Selenium, AppliTools Eyes, VSTS and Azure. As I mentioned everything also doesn’t follow best practices but I imagine that there are experts out in the open on these specific tools, Feel free if you have any hints to share.

Keep in mind that even if Visual Tests is a simple step if you don’t have any automatic tests, but they do NOT replace a good suit of Unit Tests.

Unit Tests can still give you a better best coverage when you have a more complex application and/or have integrations against other systems.

What’s next?

Our next issue is that the tests often fails if someone plays around with content on the dev server for other tests. One approach for this could be to spin more environments for each test purpose, or reset the database.

I have another idea that might help with this and can help with other challenges we’ve experiences. Stay tune for next blog post about Automatic Visual Tests.

Simple pattern for custom forms

Through the years I can’t really keep count on how many custom forms I have created. I have found a simple pattern so that I can easily collect, validate and save the submitted information using a Model, Validator and Saver (MVS?).

Dos and don’ts

I want to show you some practices I consider as Don’t and what you can Do to avoid them. These are some ways I’ve seen that people have handled form submits in a bad way. Some of them are really obvious but worth repeating.

The use case throughout this post is a form that contains a name field. The name field is required and the name must start with “Alf”

I also want to make it easy to add several fields into the form without making the code too complex.

In the code examples I won’t go into details on how I pass validation messages to the view but in the end I will give some examples of that as well.

Let’s start:

1: Don’t repeat yourself:

A common way to collect the form input after submit is to go either to TextBox.Text (WebForms) or form[“name”] on the FormCollection (MVC).

Nothing wrong with that but don’t run to the FormCollection every time you need your value.


1-dont1.png

Specially if you want to add fallback functionality or extend the form somehow.

1 dont fallback


Do save it:

So save it to a single variable and reuse it.

Personally I prefer a local variable that is passed throughout the life cycle instead of a private Field or Property.
That makes it easier to make sure that nothing is fiddling with the value.

1-do-variable1.png


And if you would like to add fallback, you only need to take care of that at one place.

1-do-variable-fallback1.png


2: Don’t have a never ending list of parameters

Having just the name is a piece of cake. But when we need to add more fields it can get quite messy.

2-dont-parameters3.png


It makes all the methods hard to read, hard to extend and easy to use wrong. This also takes me to an ugly part (in my opinion) in C# – the out parameter.
For example if you move the gathering of the form input into a separate method:

2-dont-parameters2.png


I think this is very hard to work with and makes the code quite ugly and comples.

Do use a Model

It’s much easier to transport lots of values using a Model. Also if you need to extend the form, you can easily add more properties to the class.

2 do model.png


Just create a new instance of it, populate it and pass it around:

2-do-formcollection-controller1.png


Bonus: With MVC you can use the Model already in the view and get it populated in the Controller!

Quite simple, since I don’t need to have the FormModel in my ViewModel (normally I don’t) but I want to use the FormModel, just do it like this View.

2 do formmodel controller.png


And let it be sent straight to the controller. Just keep in mind that the variable in the Lambda expression must match the variable of the FormModel parameter in the Controller.

2 do formmodel variable.png


Though you’ll need to implement separate logic and fallback functionality yourself unless you start doing some more fancy MVC magic.

2-formmodel-controller-fallback1.png


Validation

With MVC populating your Model, you could add validating attributes such as [Required] to the Model Properties, however I think it’s quite alot of work to get that working the way I want to so I’m doing the frontend and backend validation myself.
Of course using native browser functionality as much as possible for example with the required attribute.

3: Separate functionality

With this I’m using patterns and principles such as “single responsibility”, “separations of concerns” and striving for testability and so on.

It’s good to separate your code so that you can isolate the functionality based on what they do. It is also easier to create abstractions for these to change behavior in the future or be used with Feature Toggles.

What parts can we separate?

Looking at the Controller I can identify two parts that concerns the form: Validating and saving the form.
Therefore we can create separate classes for this.

Summarize.png

Validator:

3 validator.png


A Saver:

3 saver.png


And use them in the Controller:

3-controller1.png


If I don’t let MVC doing the population of the Model, I sometimes have a specific class for that as well.

3 populator.png


Result

Note that each class have a Result class. This is to not have magic code such as “result message == null” means “everything wen’t fine”.


Some people would have the validation to return a bool and have an out parameter with the message. But what did I just say about outing?

So they return a ResultModel that contains whether everything wen’t fine and possible messages telling what is not fine.

As you can see, the Validator and Saver have a Result class each. This could be the same class but sometimes I have ended up extending the class for one of the classes so therefore I keep them separated.

Tadaa!

So with this done, we have

  • Extracted validating and saving the form into separate classes.
  • To keep it simple and extendable, we have created a FormModel that contains all values
  • A ResultModel to return the result (hence the name).

You can see the code examples on my GitHub as well as a more finished concept that can be added to an Alloy website.

Do you have any tips on how to work with forms? Leave a comment!